Posted by & filed under Makerspace, Makerspace Happenings.


Written by Cameron Driller | June 10, 2020


Foreword

Articles across the science and internet communities claim entire lists of fermentation benefits from probiotics to its ease of creation. However, I am naturally skeptical of foods that smell weird, so I decided to try for myself. Granted, I could have just purchased the food and tried it that way, but one claim is how easy it is to make fermented foods. I couldn’t claim to be a DIY biologist if I didn’t have a fermentation project under my belt, now could I?

This series will start by looking at the background for fermentation and what you need to know before you plan out the recipe. Granted, plenty of recipes exist that don’t involve sauerkraut or even cabbage, but sauerkraut is an easy beginning into fermentation and will hopefully give you a foundation to work off for any other recipes.

I decided to start with Sauerkraut for a couple of reasons. One, it’s cheap and simple. The ingredients are salt, cabbage, water, and any extra seasonings I want to add. Two, it’s low maintenance. Most recipes just have you place the prepared ingredients in a jar and let it sit for two weeks. I’ll be checking in once every other day until it’s finished. Afterward, I’ll simply place it in a clean jar and eat as I wish.


What is fermentation?

Fermenting is a biological reaction where organisms, usually bacteria, digest and use fuel to sustain themselves. For example, yogurt is made when a certain species of bacteria consume the lactose (sugar) in milk for its fuel and turns it into lactic acid as waste. This same concept is how every fermented food/drink works. The reason the fermented food doesn’t make you sick is that the organisms are not harmful to humans and the by-products they make aren’t toxic. Keep in mind though, fermented foods can rot like any other food if harmful bacteria can grow. That’s why most recipes for fermented foods emphasize that you wash your containers, dishcloths, and hands often.

Setup

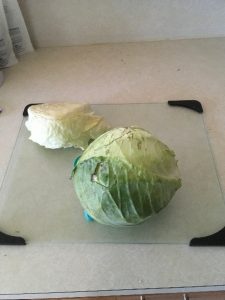
As I mentioned before, the ingredients I used are simple. I chopped up two medium-sized heads of cabbage and separated the core from the leaves. I placed the chopped cabbage leaves into a bowl and sprinkled ~2.5 tablespoons of salt over the cabbage. I mixed the two with my hands and covered the bowl with a cheesecloth before leaving out overnight. Now, I like crunchier sauerkraut than most people, so you’ll probably want to massage the salt into the chopped cabbage to make sure as much water gets out as possible.

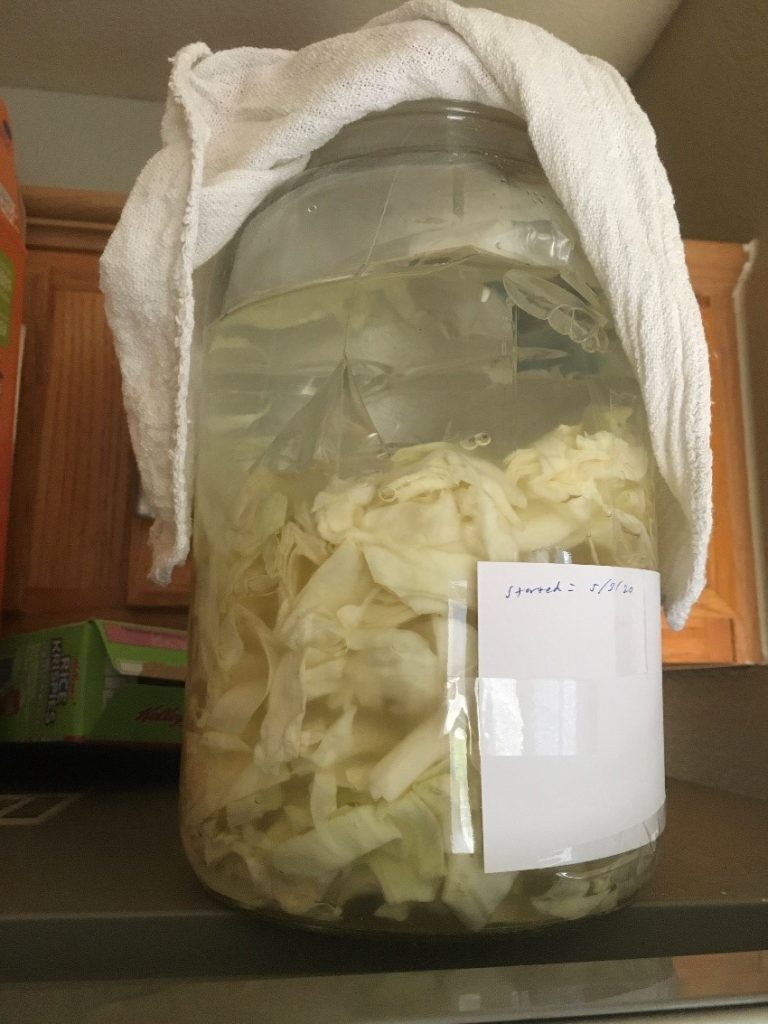
The next day, I placed the entire bowl of cabbage into a gallon-sized jar and added enough water to cover the cabbage. To make sure the cabbage stayed below the waterline, I filled a gallon-sized Ziploc bag with water and air and placed it on top of the cabbage. I then covered the jar with cheesecloth, put the lid on gently, and labeled when the batch would be done fermenting with a taped-on notecard.

Done. I put the jar on top of my fridge and left it alone ever since. Now and again I’ll check the jar to make sure it’s working and nothing unsavory is growing, but that won’t be much effort. At a cursory glance, I’ll know if it’s working because the water will be cloudy, and bubbles will form around the cabbage.

Posted by & filed under Events, Makerspace, Makerspace Happenings, Programming.

Summer Programming Classes with The Spark

The Spark Summer Programming Class

This summer The Spark Makerspace at The University of North Texas Libraries is offering online programming classes. The classes are designed to improve digital fluency for our students through game design and programming, with a focus for individuals with no or very limited programming experience.

For more information go to: https://guides.library.unt.edu/spark/SummerProgramming


Posted by & filed under 3D Printing, Makerspace.

What is FDM Printing?

FDM printing is the most common method of 3D printing. It is the easiest to learn and is the most cost-effective way to print. FDM printing stands for Fusion Deposition Modeling. It is also commonly referred to as FFF, which stands for Fused Filament Fabrication. Both FDM and FFF are the same process, and the terms are interchangeable. The actual process involves melting a spool of plastic material at high temperatures through a nozzle that travels along a specific path to model the object you are printing. This path is created by G-code, a list of coordinates that tell the nozzle where to go and when.


Advantages:

The most considerable advantage of FDM printing is its price. It is very cheap to print using FDM printing. A good hobby printer costs about $250, and material can cost $20 per spool, which gives you 1kg of material. FDM printing is very friendly to people who are new to 3D printing, which is one of the main reasons it is so popular. All the user needs to do is load the object into the slicing software (so the printer knows what to do with the object), press print, and give the printer time to make your part. If the objects you want to print are for practical purposes, FDM prints are stronger then SLA prints, which allows them to last much longer.


Disadvantages:

Because FDM printers are so popular, there are countless different from printers from which to choose. All these options can make it hard to decide what printer to buy, and they vary widely in usability from one to the other. FDM printers can also be a bit finicky, depending on the printer, causing you to spend time fine-tuning it. Many variables, like the software settings, mechanical aspects, maintenance, and even the climate of the room, can all affect how your printer runs to get a successful print. There are also many different types of filaments that require higher temperatures, heated beds, enclosures for the printer, and stronger filaments that can even wear down the printer’s internal components. Not all printers can print with every filament type, so be aware of the limitations of your printer. Some brands will mention the specific filaments their printers can print with, which is something to keep in mind depending on what you want to do with a printer.


What is SLA Printing?

SLA printers are quickly growing more accessible since the price of these printers is getting cheaper. A few years ago, a reliable SLA printer would have cost roughly $2000, but now an SLA printer that can produce high-quality prints costs about $300.


This method of printing involves a pool of resin rather than plastic cured by ultraviolet light. The light is projected by an LCD screen below the resin pool, curing the resin at each cross-section. The printer will then peel the cured layer off the base to let fresh, uncured resin flow under the object allowing the light to cure the next layer. Because this method cures material, rather than depositing material layer by layer, SLA printing enables you to achieve much greater detail in the object than what you might be able to get out of FDM printing.


Advantages:

SLA printing is the way to go for objects with high detail, steep overhangs, and intricate parts. SLA can also achieve much greater detail in layer height, to the point where layers are nearly indistinguishable. Most of the applications for SLA include miniatures, jewelry, and highly complex objects. This printing method is the best choice for aesthetic prints.


Disadvantages:

The printer itself is quite loud, given the fan needs to work hard to keep the electronics from overheating. The resin used to make the prints has a very potent smell, causing you to need a well-ventilated area for the printer when using it. When the print is complete, it needs to go through an acetone bath to remove the uncured resin and be placed in a UV curing station to improve its strength. These added steps to post-processing are not needed with FDM printing and require extra materials that need to be purchased. The prints themselves, though very high detailed, are not very strong. SLA prints cannot withstand stress well before they break, so if the object goes under any consistent strain, it will not last long. SLA prints are also sensitive to UV light, so if they are exposed to the sun for an extended time, they will become brittle and degrade.


Of course, there are more methods to 3D printing than just these two, but since they are the most common, they are the most reasonable to discuss. There are many more advantages and disadvantages to both FDM and SLA printing, but both are perfectly effective for 3d printing for different needs and purposes. When deciding which method is the best for you, look at what you need to print, what its purpose is, and the limitations that either method possesses to produce your intended object effectively.

Posted by & filed under Uncategorised.

Hey there! My name is JP, and I’m a Lead Technician at the makerspace and a Bachelor of Arts and Applied Science major at the University of North Texas. Working at the makerspace over the last three years has been such a rewarding experience for me. I can access many types of creative tools, resources, and equipment that I can’t find or have access to anywhere else on campus. A lot of my work at the makerspace revolves around 3D printing, CNC routing, 3D modeling, 3D scanning, project planning, and team development. What’s more, I’m always surrounded by creative coworkers and students that are usually working on something I can learn. 


Over the past year, I was able to work on several projects for the makerspace, and I’ll highlight two of the most interesting ones below. This project was to help an MFA candidate create one of the sculptures for her art exhibition at the Union Art Gallery. Her installation combined traditional Chinese ceramic making and digital fabrication processes. I was able to use the vacuum forming machine to create the object. The photo on the left is the vacuum form we made, and the one on the right is her final installation titled Balance of Power, 2019. 


I also got to create an infinity mirror for our magic of making event. Creating this mirror took a little more time than I expected, but it was worth the wait. I used a thin metal rod, scrap wood, spray paint, LEDs, spray paint, and mirrors, and although it wasn’t finished in time for the event, it makes for a good display piece at the makerspace.


Right now, one of my main projects is hosting the makerspaces’ debut podcast. We’ve completed recording our first episode and are now laying the groundwork for more episodes. In the first episode I spoke with our manager Judy Hunter about Makerspaces. Our conversation expanded to topics like the maker movement, the importance of makerspaces in our educational system, and how to get kids and young adults interested in their creative potential. Steven did a fantastic job with editing and producing, and there will be more info on the podcast later. 


The makerspace is an excellent resource for students looking to create and learn new things or come to enjoy the things other people have made. Until next time, this is JP signing off. 

Posted by & filed under Makerspace, Makerspace Crew Highlights, Makerspace Happenings.

I have worked at the Factory or now known as the Spark for three semesters now and I’m finally graduating. The Factory gave me many opportunities to grow in both knowledge and as a person.

The workshops that I taught and assisted with helped me become more comfortable in a large crowd, as wells as broadening my knowledge on several different topics and some that I have never heard of such as using a serger. The staff is friendly and knowledgeable about a verity of topics. Overall, I believe that the Factory or now the Spark is extremely useful resource for students especially those who are working on capstone type projects.

Posted by & filed under Adobe Suite, Makerspace.

What’s Photoshop about?

Adobe Photoshop is a program for editing photographs, graphic design, digital art, and much more! It uses layering to allow complexity and versatility in the editing process and offers powerful editing tools that are capable of doing just about everything when used correctly. And. Photoshop, or Lightroom, is it better? The truth is not that you compare the two programs, but that you define what you need for your project. Both are fantastic Adobe programs that provide excellent photo editing features. And why do you use Lightroom instead of Photoshop? Use both the simple way and use Photoshop when you can’t find Lightroom!

Photoshop CC

If you want more power over your photo editing, than you need Photoshop CC. It is the most robust and sophisticated program for photo editing. Photoshop CC is not designed exclusively for photographers.

You will work with 3D models and a qualified color control program on the Photoshop CC. Everything to remember certainly whether you want to print artwork, and not just pictures. The downside is that there’s a high learning curve at Photoshop CC. You do not know where to start as a beginner since there are so many tools and functions. However, as a beginner, you will be able to install the Previous Version of Photoshop and start simple modifications such as text editing, replacing the background, and so on so forth.

1. ADVANCED RETOUCHING

You need Photoshop if you want to make a leg shorter, an individual taller, or apply other elements to your frame. Also you can brighten and darken the skins, you can also able to put make-ups using on the photoshop without real make-up on women face.

2. ADVANCED HEALING

When in Lightroom, you can replace small items and white teeth; the features aren’t as spectacular as using the magic-conscious material of Photoshop’s healing brush and patch software. The Content-Aware method helps Photoshop to search and examine the whole image as it tries to find out what the photo field would look like if the object were not there. It is still not flawless, and you will always (most likely) need to fine-tune the images with one of the other retouching tools from Photoshop until you have the result you want.


3. CREATIVITY

If you want to create a single creative picture using elements from various photographs, Photoshop is your choice. Again, Photoshop’s only constraint is the imagination! You may imagine an unrealistic world, and you can bring it to the designing, which looks like a real one.

4. KEEP Capital!

You don’t have to hire someone to print your business cards, show posters, flyers, and more after you master Photoshop. You can create anything you want with Photoshop, whenever you wish. Start a new page and take advantage of your creativity.

5. MAKE MONEY

You can provide photo retouching services, design logos, open a graphic design company, build and sell PSD web templates, or start a website/YouTube channel where you make videos. Also, you can become a freelancer in the graphic designing category.

6. HUGE TOOLBOX

Every progressive release of Photoshop appears to bring increasingly useful tools into the mix. From content-aware loading, camera shake effects removal, lens filters, and automated panoramic image stitching, there is a resource for almost any job

Posted by & filed under Makerspace, Photography.


Photography is a unique form of art, as it is both instantaneous and relatively new compared to mediums such as drawing or painting. These days almost everyone has a high quality camera on them at all times, and it’s as easy as ever to start honing in your image making skills!


 To understand how an image is made, let’s first look at how a camera operates. There are three elements of an exposure or image: shutter speed, aperture, and sensitivity (or “ISO”). A perfect exposure or image balances these elements to make a photo that is neither too bright nor too dark. Shutter speed controls how long the “eye” or sensor of the camera is open to the scene it’s capturing, measured in fractions of a second. This effects motion blur on a moving subject. Aperture refers to the size of the hole through which light enters the camera.

On most smartphones this is a fixed size, but on professional DSLR cameras the size of the hole can be adjusted to allow more or less light through and changing the “depth-of-field” effect on the final image. This is a powerful effect that allows the photographer to isolate the background from the subject by shifting it out of focus, blurring it. Sensitivity or ISO effects
how sensitive the sensor is to light and effects the grain or noise on the final image. These are the three elements of every photograph, and learning how to adjust them to your liking is a good first step to making amazing images.

Smartphone cameras and other types of digital cameras are most commonly used on an “auto” mode, where the camera decides how best to balance the elements of your photograph. While this is the fastest and certainly most convenient method, auto mode takes away most of the control the photographer has on their final image. Try testing out the three elements by switching your camera to manual (M) mode, where the photographer has control of every aspect of the camera. Smartphone users can find a “pro” or manual mode on many popular apps (such as VSCO), but note that aperture will most likely be fixed and unchangeable. Start by changing the ISO, bring it up to ‘6400’ or as high as it will go and change the other two elements to balance the exposure. Notice how suddenly noisy the image appears. Next set the ISO as low as it goes and change the shutter speed to 1/15. Take a photo of something moving and pay attention to how motion blur comes into effect. Those with
a DSLR can change the aperture and see how it effects the background of the image when taking a photo of something up close. With these techniques in mind, it becomes much easier to troubleshoot an image if it isn’t coming out how you’d like.

Photography, like most everything else, relies on practice, practice, practice. Challenge yourself by taking your camera off auto and start making images. You might be surprised by how differently you take your photographs!

Posted by & filed under 3D Printing, Makerspace.

What are supports?

Supports are extra plastic material printed on or around the object you are printing to help make it print and look better.

Example:


When do you need supports?

It is best to use supports when printing an object that has overhangs greater than 45 degrees. Overhangs are a diagonal part of the print where some of the top layer is printed on top of the bottom, and the rest goes past the previous layer with nothing underneath. The steeper the overhang means more material will be printed with nothing under it, causing it to droop, and create a poor surface of the part. Supports give the part something to for the object to print on when it moves past the previous layer. This holds up the parts to reduce the drooping effect as much as possible and allow the object to retain its intended shape.

Overhang example:


Drooping effect:

Object with overhang (without and with support):

How to reduce supports?

Supports are useful, but they increase the time it takes to print an object and increases the amount of material you must consume per part. Reducing supports can help save you time, material, and money. Here are some ways to reduce supports for your parts:

One option is to reduce the layer height you are printing the object with. Layer height is the vertical thickness of each individual layer of the print. When you have a smaller layer height, the layer does not have to extend as far out with each layer when there is an overhang. This makes printing the overhang easier for the printer without support because more of the layer will be printed on the layer before it, improving quality. The downside to this is printing with smaller layer heights takes much longer for the object to print because the nozzle is having to complete many more travel moves.


(Each level represents a single layer on both sides. You can see how far off out each layer must travel on the left. When the layer height is reduced on the right, a much smaller outward distance is traveled by each layer.)


Another option is to alter the object itself to include as little overhangs as possible that exceed 45 degrees. If you were the one who designed the part, that makes it very easy to go in and edit the original file. If the file is an object you found online, that makes it slightly more difficult to make the alterations you need. Having overhangs over 45 degrees is not a deal breaker, all it means is you will need to do a little more work getting the part to come out how you want it.


One more option is to experiment with the object’s orientation. Orientation is the position in which the object will rest on the print bed. By changing the objects orientation, you are also changing the overhang angles without altering the shape of the object. With certain objects, you may be able to remove all overhangs simply by changing the orientation.

Ex.


the vertical pillars represent support material. For A. there is very little support, but still some at the base. By rotating the object 180 degrees B. can print with no support at all, and no change to the objects shape. C. can still print, but it was rotated in such a way that even more support material is added than necessary, so be careful that you are printing in the best orientation possible.)

What are some problems with supports?

The biggest issue with supports comes with post-processing. Post-processing is the extra work you need to do to the object after it is done printing to make it look like it is supposed to. When printing with support, you need to manually remove it from the print, it does not simply go away when done. If your support settings are not well set, the support can almost seem glued to the object, and you can spend large amounts of time chipping that support material away until it is all off. If your settings are better set, then once you remove the object from your build plate you may be able to hold the object in one hand and pull the support material off in other with one motion. Dialing in you print settings takes time, along with trial and error, but once you can make it work for you it can save you a lot of time overall.

Ex. 

Another issue is surface quality. Yes, support helps with drooping to improve surface quality, but it is also sticking to your object. Once that material is removed from the object, wherever the support was touching will leave a scar on the object from being pulled off. A way around this is to finish the surface with sandpaper/other abrasives or paint the object to smooth it out.

Lastly, one problem with supports is environmental. The support material, after being taken off the object, becomes waste and is thrown away. That is extra plastic that you are using that serves no function and goes straight into the trash after printing. That being said, the most common 3D printing filament is PLA, which is a starch-based plastic derived from plants, meaning it is biodegradable. This is not the case for most others however, so keep that in mind when printing with other types of materials.


One more Solution:

Some printers have more than one nozzle, meaning they can print more than one material at a time. There is water-soluble filament (meaning the filament can dissolve in water) that can be used as support material. You can print the object you want with one nozzle and material, while the water-soluble support material is printing through the other nozzle. Once the print is finished, you can take the entire print off the bed, place it in water, and the support material will dissolve away. This greatly reduces the hassle of post-processing and leaves a much better surface finish by eliminating the concern of scaring the surface when pulling the support material off the part. If this is a viable option for anyone with access to a dual head printer, I recommend this as the best way to print complex object and maintain the highest level of surface quality.


Ex.

(Right image is the object after support material is dissolved. Left image shows to water-soluble filament still attached to the object)


Written by: K. Mortensen

Posted by & filed under Uncategorised.

A guide to landscape photos:

Landscape photography is a peaceful and relaxing way to spend time with nature and the great outdoors. This can be a great reason way to get out of the house during social isolation.

To take great landscape photos, first try scouting out an area you believe would make for a good composition. This can be done in person, or alternatively online through Google Street View. For gear, make sure to pack a wide angle lens and tripod, as well as anything you would bring on a hike. Make sure to plan out your shoot before heading out, as this can help save time later and usually leads to a better end product.

Landscape photos are most often done with a high depth-of-field to keep everything in focus, both near and far. This is achieved by using a high aperture setting. Most lenses can either go up to f/22 or f/16; combine these high apertures with the tripod to ensure a steady shot, as the camera will most likely need to be set for a longer exposure time. Once you are ready to shoot, make a couple test images and review them on-camera to troubleshoot unexpected issues. If you find that your images are blurry despite using a tripod, try turning on the self-timer to alleviate camera shake from pressing the shutter button. 

As always, make sure to be safe if going out alone. Bring plenty of water and pack a snack and first aid. Happy shooting!

Posted by & filed under Makerspace Crew Highlights.

My Name is Brennen Johnson, I am a Senior majoring in Information Technology. The Factory Has allowed me to expand my horizons not just from technology related topics but tolls used in creation such as laser cutting a CNC milling. My skill is in single board computers (Raspberry Pi and Arduino), Robotics (Lego Mindstorms, Vex, Hummingbird), and Laser cutting.

Currently I am working on arcade cabinet u
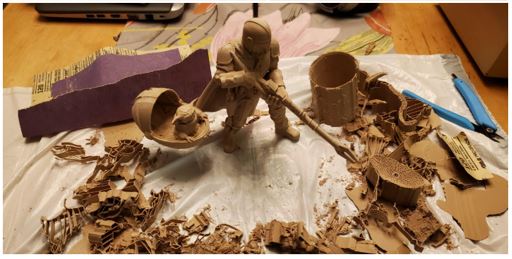
sing a raspberry pi aka the picade. First the inspiration for the project was from an instructables but some of the parts that we had on 
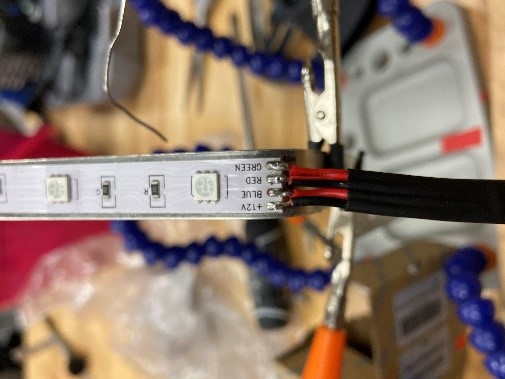
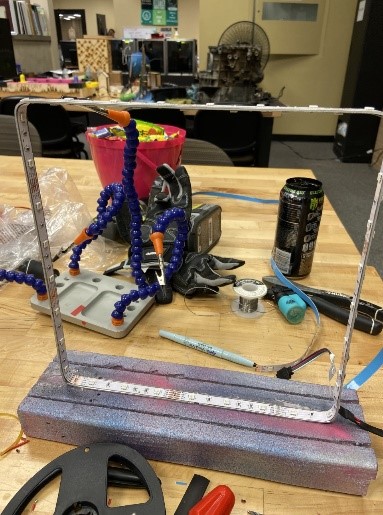
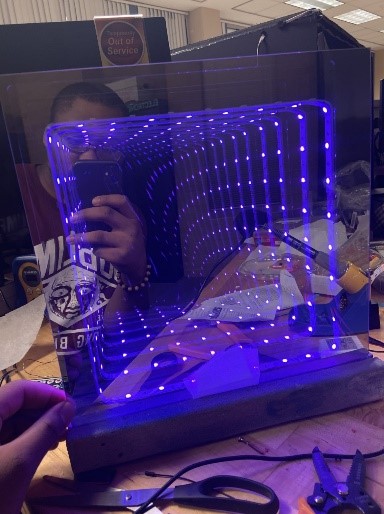
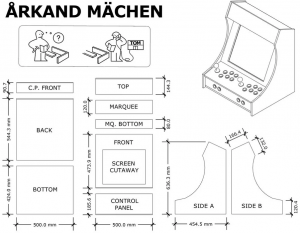
hand did not quite fit. To accommodate this the designs needed to be scaled up a bit. To cut the side pannels I used the lasercutter since some of the edges are curverd it would have been difficult to use the wood working tools we have on had. To run games on the system I used Retro pi to handle the games. This is a free software that can be installed on the raspberry pi to emulate old game consoles to enable the user to play olds games.

top