How to thread a serger 
This may look intimidating but once you’ve done it and learned it, it is rather easy.
But here we go! Threading your serger starts with your thread! Since sergers feed the thread through the machine faster than a regular sewing machine; using spool caps and thread cone inserts are a must. Also, note that not all your cones have to match. If you cannot afford 4 cones of thread wind 3 bobbins with that same color and use those.
Now, pull your thread through the fully extended thread tree, and the thread guides above the tension disks.
Pull your threads through tension disks making sure they are well seated between the disks. I find it faster to do this for all 4 threads at once since I’m short and I have to stand up to reach the thread tree.
Here is the order you should be threading your loopers in;
1) Upper looper
2) Lower looper
3) Right needle
4) Left needle
***Note: Threading out of order will cause thread jams.
Turn your handwheel toward you until the upper looper is accessible.
Then, using your tweezers pull the thread through the eye in the upper looper.
Now the lower loopers, this one is personally the worst, but you will get through this I assure you!
Pull the thread through the lower looper thread guides.
Turn your hand wheel until you have access to the thread guides that are attached to the lower looper and pull your thread through the guides.
Now turn your handwheel until you see the left edge of the lower looper peeking out.
Use your tweezers to grab the thread and thread the eye or thread guide on the left side of the lower looper.
Now, using your tweezers again, bring your thread back to the right side of the lower looper.
Now things get a little tricky because we have to keep turning the handwheel to thread the lower looper, it’s easy to get the lower looper thread under the upper looper arm. This will cause the thread to jam every single time.
Also, we need to make sure the upper and lower looper threads do not cross.
The best way to do this is to turn the handwheel (always toward you) until the lower looper is above the upper looper. Then thread the lower looper. 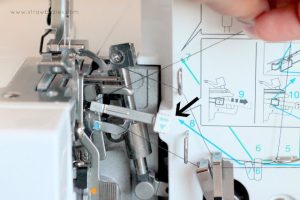
Pull the thread through the lower looper thread guides.
For this, pull out the small ‘threading lever’. Position the thread so it’s just resting against the lever as shown.
Push the lever back into place while holding the end of the thread.
Thread the eye of the lower looper, making sure not to cross threads with the upper looper. In other words, make sure that the lower looper thread is over the upper looper thread.
The lower loopers are done!
Threading the needles is the easy part. Thread the right needle first then the left needle second.
Make sure your thread is well seated in the tension disks, then run it through the thread guides.
Then pull the thread through the thread guide in front of the needle bar and then the needle.
Also before you get serging;
Just like with a sewing machine, I find it’s easier to start serging with a small piece of fabric under the presser foot– it helps keep the thread from being pulled back into the machine. After that, you should easily be able to make a thread chain.
If none of that made any sense here is a video tutorial.
https://www.youtube.com/watch?v=WThwuOfOSbg
Written By: T. Bruner
-Stay tune to the next post for general advice and a FAQ-