“This Insanely Easy Silk Infinity Scarf tutorial is a two-for-one. Firstly, and most importantly, you get a gorgeous infinity scarf sewing pattern, and secondly, you’ll learn how to sew a hem with the overlock technique if you have a serger. If not, the tutorial also includes instructions for regular sewing machines. This silk scarf is amazingly easy to make and will keep you looking fabulous even in the coldest winter months. Whether you use a frayed edge or a rolled hem, this scarf will brighten up any winter outfit!”
“For you or other fans of the hit program, add this Downton DIY Headband to your list of easy-to-make gifts. Free vintage sewing patterns like this one look like an heirloom but can be made from a ribbon and serger. This DIY headband is reminiscent of styles that have sailed through centuries. Whether you’re dressed up or down, this sewn accessory will top your ensemble off with a romantic touch, and it only takes under an hour to make.”
“This project is ideally suited to those who are just getting started with their serger. It is quick to sew and easy to wear and combines both the use of the serger and the sewing machine. Made using forgiving jersey, you can choose the length to make either a dress or a t-shirt, both ideal summer makes. You could use heavier weight jersey or even stretch denim to make autumn/winter versions too. The tutorial is written by sewing author, teacher and pattern designer Wendy Ward.”
Project Type: Make a Project
Time to Complete: In an evening
Sewn by: Machine
That is all! Thank you for reading this long blog post!
The Lulzbot TAZ 3D printers are one of the most user-friendly printers on the market. The first two printers in the LulzBot 3D Printer cluster were Prusa RepRaps put together with printed parts purchased off the Internet. They were built in the first quarter of 2011. These two printers printed the next set of parts needed by the subsequent LulzBot Prusa Clonedels.
LulzBot was founded in 2011 by the parent company Aleph Objects. Their fully open-source workhorses are renowned for their robust design and reliability, though their high prices have largely kept them off the individual hacker’s bench. While the printers did not do well in the consumer market, it did exceptional in the industrial market. The reliability of their machines got them to be used by the United States Marines. The open-source system led it to be used by The National Aeronautics and Space Administration. NASA uses a modded Lulzbot TAZ 4 to 3D print tools on the International Space Station.
Though the Lulzbot TAZ printers had short success in the industrial and commercial field, consumers did not want to spend a grand on a desktop printer when there were better, cheaper options. Due to this, in 2018, the company announced that there were many layoffs in the company. This came in correlation with bad financials following the first quarter of that year. An email attributed to Aleph Objects states, “We regret to inform you that the owners of Aleph Objects Inc, makers of Lulzbot 3D printers, have decided to close down the business as of Wednesday, October 9th, 2019. Operations will continue through October 31st, 2019 to sell through existing inventory.” Of the company’s 113 employees, only 22 would remain onboard to maintain day-to-day operations.
Following the speculation that Aleph Objects, manufacturer of Lulzbot open-source 3D printers had met its end, the company has refused to deny claims that it is indeed shutting down. Some insiders said they had heard expected a buyout, and soon the sale of Aleph Objects to Fargo Additive Manufacturing Equipment 3D (FAME 3D) became official.
This new financial backing certainly is good news, but it would be naive to think this is the end of LulzBot’s troubles. The community has made it clear that cheaper and more accessible desktop printers are more attractive. The company has said they are willing to create a new, more affordable option to their printers. Though Lulzbot’s company has had issues internally, the projects such as its entry into the 3D bioprinting market in early 2018 may keep the printer’s name afloat.
Use a bit of thread wax to stiffen the ends of the thread to make it easier to thread the needles and loopers.
THIS ONE IS IMPORTANT: It is possible to rethread your loopers by ‘tying on’ a new thread. Snip the upper looper and lower looper threads between the thread tree and tension disks. Replace the spools, tie the new thread to the old with a small overhand knot, and pull through the loopers.
Also, just a reminder! If you are running short on thread cones, you use thread spools in your needles. You can even wind your own threads spools from your serger cones!
Buy good quality thread
Serger can’t backstitch (Well, in fact, it can… but you will not desire to do so, because it will cut your newly made stitches!)
IMPORTANT! Never Sew on Pins! Your needle will break! and either hit you in the face or fly off somewhere. Also, you will have to buy another double needle!
A Serger goes faster than a sewing machine (a.k.a: don’t push down your foot!)
FAQ
Do I have to have a serger?
Well, it depends on what kind of sewing you do and how often you do it. You technically don’t even really need a standard sewing machine. Lots of people like to sew by hand. I don’t. I very much dislike hand sewing.
If crafting and sewing is just a hobby, and you don’t know if you’ll stick with it forever, a serger can probably wait, especially if you don’t have $200 to burn. You can always keep an eye out for used sergers on eBay or refurbished from amazon.
If you sew a lot for yourself or your kids, or anything else like in my case I am a fashion major in college, and on the side, I like to make costumes. Also! and you work with a lot of knits and stretch fabrics, a serger will make your life a million times faster and easier.
If you’d like to produce clothes or other sewn items for sale, a serger will make your stuff look more professional. Everything produced in stores uses a standard 4 cone serger.
So the short answer, in my opinion, is No.
What is overlocking? Are a serger and Overlocker the same thing? Is there a difference?
A serger and an overlocker are essentially the same things. These names are used interchangeably.
Overlocking is stitching the edges of fabrics ( one or more layers ) for hemming, edging, or seaming.
A Four / five thread serger forms a seam with a chain as well as overlocks the edges, so this serger is way more than a simple overlock machine.
Why do I need a Serger? What are the benefits I get in owning a Serger?
Serger finishes the seam and edges in one go – so saves a lot of your time
Serger stitch is best for sewing knits, being very flexible and stretchy
Narrow seams, overcast edges, rolled hems, blind stitched hems are all easy with sergers
How is a serger different from a sewing machine? When to use a serger vs sewing machine?
A serger cannot be a substitute for a sewing machine. You cannot topstitch, sew buttonholes, attach zippers or stitch corners with a serger.
But for its particular use, it is the best. it can make your sewing look top-notch. It sews, trims, and overlocks the edges fastly and conveniently in one go. You can use it as a very useful accessory which will make your sewing a lot easier and faster.
What are the different types of sergers available?
The sergers are categorized according to the number of threads they use to form stitches.
2- thread overedge serger – This is an overlocking machine alone; it does not sew a seam.
3 Thread Overlock serger – I would recommend this as a useful serger as it works seams and overlocks as well.
3 / 4 Thread overlock serger – Here 3 thread stitch is made with an extra stitch down the middle. This is a very suitable one for sewing thin knits as well as woven cloth
4 Thread overlock – This serger makes a seam with two thread chain stitch and then uses two threads to overlock the edges
5 Thread overlock serger – This serger makes a seam with two thread chain stitch and then uses three threads to overlock the edges
What are the things to look for when buying a serger – Must-have features in your serger
How many threads are used in the serger? One, two, three, four, or five
Does the serger have a free arm?
A free arm is needed to easily sew all points of garments.
Is it easy to thread?
A sewing machine is a breeze to thread. But not so the serger. At first, you may find the instructions difficult to follow and difficult to remember. Ensure that the instruction manual of the serger has clear instructions to thread the machine easily and efficiently. Check that the serger comes with color-coded guides to thread properly.
Can you change the stitch width and length easily enough?.
Does it have other features like other types of stitches and is it easy to change between them?
The serger usually has an overlock & chain stitch. Check if your serger has other stitches you may need like a cover stitch or rolled hems, blind hem. Check whether you need them even if the machine has them. You should not be buying extra features that you may not even use after the first few times.
Does the serger feel stable when the machine is sewing or does it feel fragile?
Can the tension be adjusted easily enough?
Accessories along with the serger – Do they cost extra and how does it add to the cost?
Your serger will usually come with the following accessories – dust cover, travel case, accessory case, carrying handle. Verify that the serger accessories and the manual list match
Can the serger handle heavy fabrics or many layers of fabric?
Written By: T. Bruner
-Stay tune to the last post of the Serger Series: Easy Project Ideas-
This may look intimidating but once you’ve done it and learned it, it is rather easy.
But here we go! Threading your serger starts with your thread! Since sergers feed the thread through the machine faster than a regular sewing machine; using spool caps and thread cone inserts are a must. Also, note that not all your cones have to match. If you cannot afford 4 cones of thread wind 3 bobbins with that same color and use those.
Now, pull your thread through the fully extended thread tree, and the thread guides above the tension disks.
Pull your threads through tension disks making sure they are well seated between the disks. I find it faster to do this for all 4 threads at once since I’m short and I have to stand up to reach the thread tree.
Here is the order you should be threading your loopers in;
1) Upper looper
2) Lower looper
3) Right needle
4) Left needle
***Note: Threading out of order will cause thread jams.
Turn your handwheel toward you until the upper looper is accessible.
Then, using your tweezers pull the thread through the eye in the upper looper.
Now the lower loopers, this one is personally the worst, but you will get through this I assure you!
Pull the thread through the lower looper thread guides.
Turn your hand wheel until you have access to the thread guides that are attached to the lower looper and pull your thread through the guides.
Now turn your handwheel until you see the left edge of the lower looper peeking out.
Use your tweezers to grab the thread and thread the eye or thread guide on the left side of the lower looper.
Now, using your tweezers again, bring your thread back to the right side of the lower looper.
Now things get a little tricky because we have to keep turning the handwheel to thread the lower looper, it’s easy to get the lower looper thread under the upper looper arm. This will cause the thread to jam every single time.
Also, we need to make sure the upper and lower looper threads do not cross.
The best way to do this is to turn the handwheel (always toward you) until the lower looper is above the upper looper. Then thread the lower looper.
Pull the thread through the lower looper thread guides.
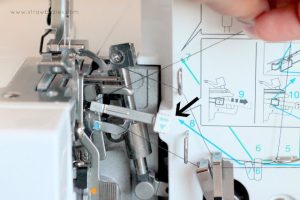
For this, pull out the small ‘threading lever’. Position the thread so it’s just resting against the lever as shown.
Push the lever back into place while holding the end of the thread.
Thread the eye of the lower looper, making sure not to cross threads with the upper looper. In other words, make sure that the lower looper thread is over the upper looper thread.
The lower loopers are done!
Threading the needles is the easy part. Thread the right needle first then the left needle second.
Make sure your thread is well seated in the tension disks, then run it through the thread guides.
Then pull the thread through the thread guide in front of the needle bar and then the needle.
Also before you get serging;
Just like with a sewing machine, I find it’s easier to start serging with a small piece of fabric under the presser foot– it helps keep the thread from being pulled back into the machine. After that, you should easily be able to make a thread chain.
If none of that made any sense here is a video tutorial.
Tryston here! Today I’m going to explain what a serger is and help take the fear out of sewing with one! I’ll also be answering some common questions!
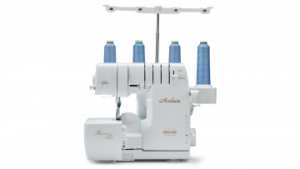
What is a Serger?
A serger is a sewing machine that binds fabric together with an overlock stitch. It uses 3-4 stitches to create the overlock stitch. This is the finishing stitch you see on many of your shirts and garments that you have around the house right now.
What does a serger do?
A serger trims the seam and encloses the seam allowance or edge of the fabric, inside a thread casing, all in one step. The width and density of the stitching are two of the many variables available on a serger. The options are not the same on all sergers. As with almost anything you purchase, the more you spend, the more options you will have. But mostly all basic sergers around the 200-300 range work perfectly for home use.
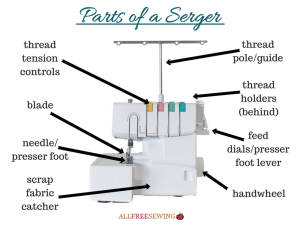
Part of a serger
The dials you see on top of the machine are the tension settings for your thread. From left to right, they are:
left needle
right needle
upper looper
lower looper
**Please note that most sergers do look the same so even if you have a different type than this the chances are they will still be very similar to this.
Left of the machine.
Adjust the stitch width and length
Turn the knife on or off
The stitch width and length/ There are times when you may want to turn your knife off.
Inside:
The main thing that sets sergers apart from sewing machines is the loopers. These are located inside the machine and under the needle.
The loopers act like knitting needles, in that they overcast over the needle threads.
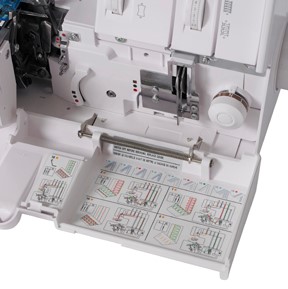
The loopers are threaded in a special sequence.
Many machines include a threading chart right on the machine, for an easy reminder when threading the serger.
Written By: T. Bruner
-Stay tune to the next post: How to thread a serger-
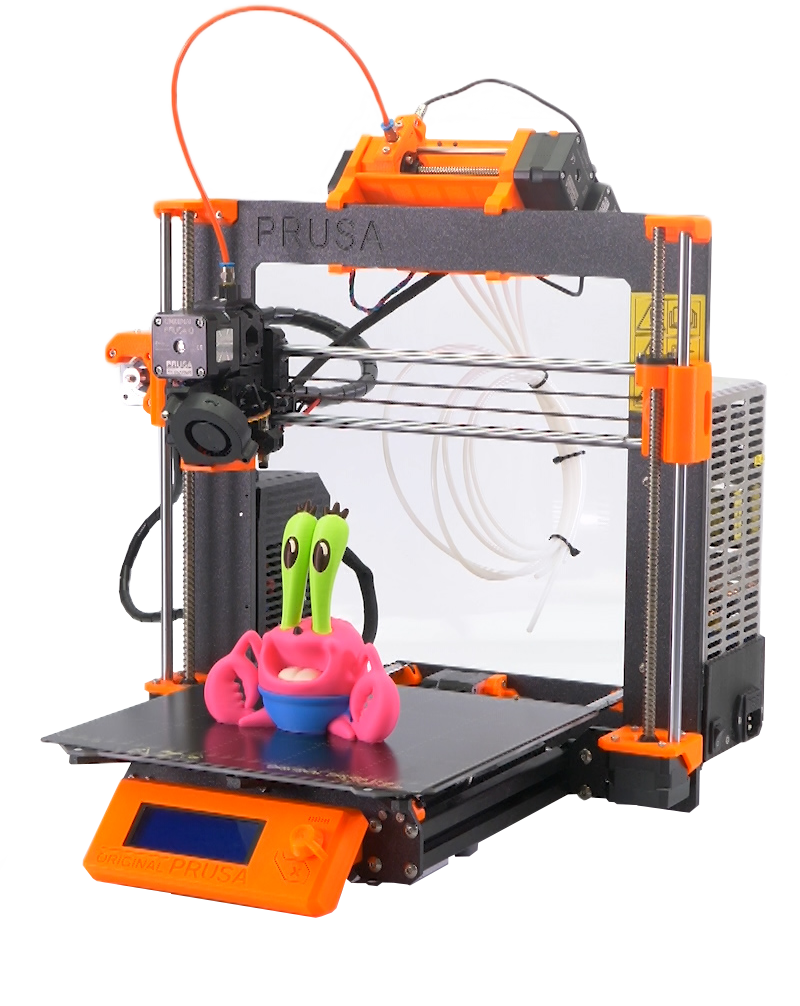
FDM printing is the most common method of 3D printing. It is the easiest to learn and is the most cost-effective way to print. FDM printing stands for Fusion Deposition Modeling. It is also commonly referred to as FFF, which stands for Fused Filament Fabrication. Both FDM and FFF are the same process, and the terms are interchangeable. The actual process involves melting a spool of plastic material at high temperatures through a nozzle that travels along a specific path to model the object you are printing. This path is created by G-code, a list of coordinates that tell the nozzle where to go and when.
Advantages:
The most considerable advantage of FDM printing is its price. It is very cheap to print using FDM printing. A good hobby printer costs about $250, and material can cost $20 per spool, which gives you 1kg of material. FDM printing is very friendly to people who are new to 3D printing, which is one of the main reasons it is so popular. All the user needs to do is load the object into the slicing software (so the printer knows what to do with the object), press print, and give the printer time to make your part. If the objects you want to print are for practical purposes, FDM prints are stronger than SLA prints, which allows them to last much longer.
Disadvantages:
Because FDM printers are so popular, there are countless different printers from which to choose. All these options can make it hard to decide what printer to buy, and they vary widely in usability from one to the other. FDM printers can also be a bit finicky, depending on the printer, causing you to spend time fine-tuning it. Many variables, like the software settings, mechanical aspects, maintenance, and even the climate of the room, can all affect how your printer runs to get a successful print. There are also many different types of filaments that require higher temperatures, heated beds, enclosures for the printer, and stronger filaments that can even wear down the printer’s internal components. Not all printers can print with every filament type, so be aware of the limitations of your printer. Some brands will mention the specific filaments their printers can print with, which is something to keep in mind depending on what you want to do with a printer.
What is SLA Printing?
SLA printers are quickly growing more accessible since the price of these printers is getting cheaper. A few years ago, a reliable SLA printer would have cost roughly $2000, but now an SLA printer that can produce high-quality prints costs about $300.
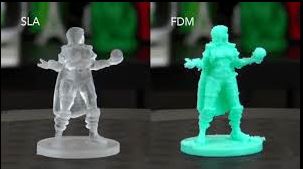
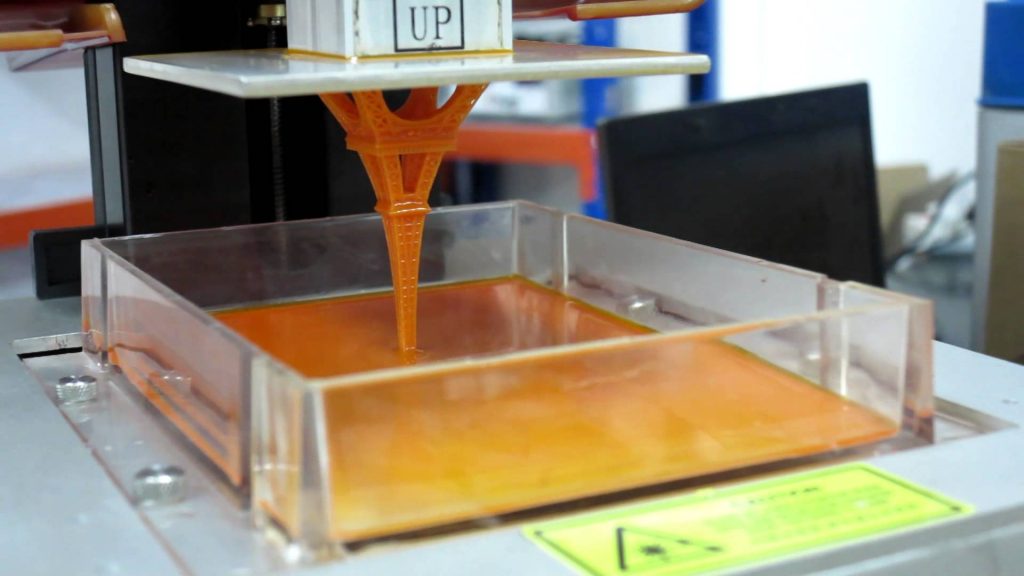
This method of printing involves a pool of resin rather than plastic cured by ultraviolet light. The light is projected by an LCD screen below the resin pool, curing the resin at each cross-section. The printer will then peel the cured layer off the base to let fresh, uncured resin flow under the object allowing the light to cure the next layer. Because this method cures material, rather than depositing material layer by layer, SLA printing enables you to achieve much greater detail in the object than what you might be able to get out of FDM printing.
Advantages:
SLA printing is the way to go for objects with high detail, steep overhangs, and intricate parts. SLA can also achieve much greater detail in layer height, to the point where layers are nearly indistinguishable. Most of the applications for SLA include miniatures, jewelry, and highly complex objects. This printing method is the best choice for aesthetic prints.
Disadvantages:
The printer itself is quite loud, given the fan needs to work hard to keep the electronics from overheating. The resin used to make the prints has a very potent smell, causing you to need a well-ventilated area for the printer when using it. When the print is complete, it needs to go through an acetone bath to remove the uncured resin and be placed in a UV curing station to improve its strength. These added steps to post-processing are not needed with FDM printing and require extra materials that need to be purchased. The prints themselves, though very high detailed, are not very strong. SLA prints cannot withstand stress well before they break, so if the object goes under any consistent strain, it will not last long. SLA prints are also sensitive to UV light, so if they are exposed to the sun for an extended time, they will become brittle and degrade.
Of course, there are more methods to 3D printing than just these two, but since they are the most common, they are the most reasonable to discuss. There are many more advantages and disadvantages to both FDM and SLA printing, but both are perfectly effective for 3d printing for different needs and purposes. When deciding which method is the best for you, look at what you need to print, what its purpose is, and the limitations that either method possesses to produce your intended object effectively.
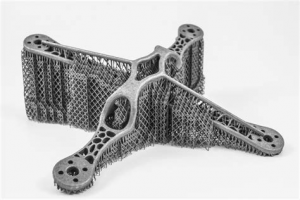
Supports are extra plastic material printed on or around the object you are printing to help make it print and look better.
Example:
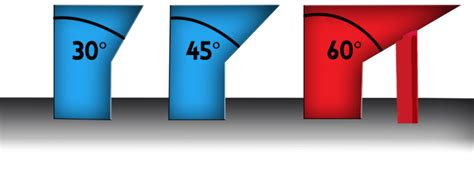
When do you need supports?
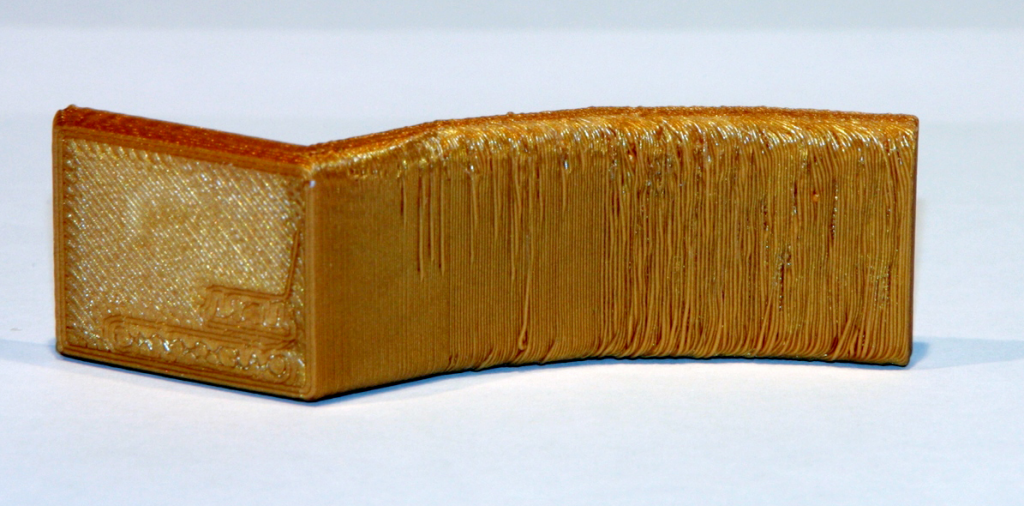
It is best to use supports when printing an object that has overhangs greater than 45 degrees. Overhangs are a diagonal part of the print where some of the top layer is printed on top of the bottom, and the rest goes past the previous layer with nothing underneath. The steeper the overhang means more material will be printed with nothing under it, causing it to droop, and create a poor surface of the part. Supports give the part something to for the object to print on when it moves past the previous layer. This holds up the parts to reduce the drooping effect as much as possible and allow the object to retain its intended shape.
Overhang example:
Drooping effect:
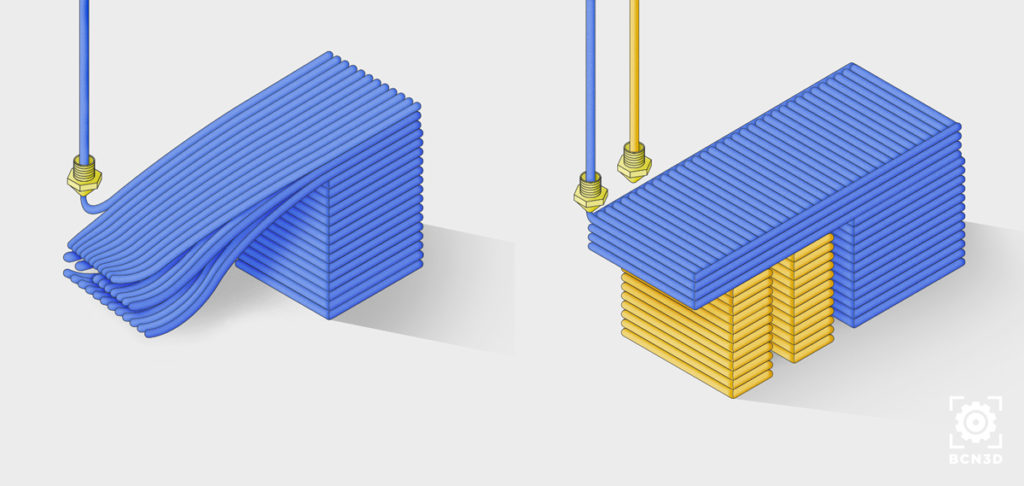
Object with overhang (without and with support):
How to reduce supports?
Supports are useful, but they increase the time it takes to print an object and increases the amount of material you must consume per part. Reducing supports can help save you time, material, and money. Here are some ways to reduce supports for your parts:
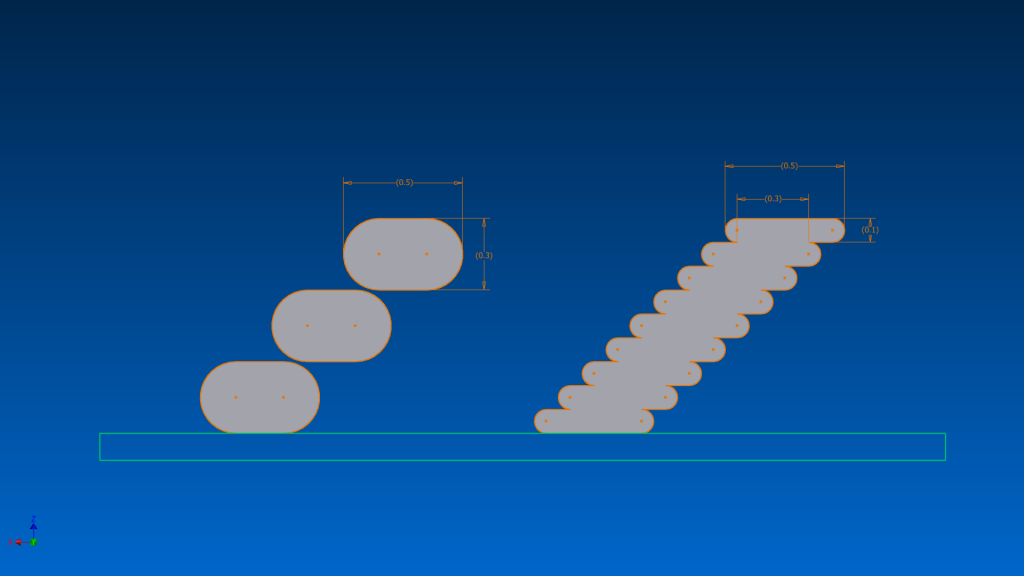
One option is to reduce the layer height you are printing the object with. Layer height is the vertical thickness of each individual layer of the print. When you have a smaller layer height, the layer does not have to extend as far out with each layer when there is an overhang. This makes printing the overhang easier for the printer without support because more of the layer will be printed on the layer before it, improving quality. The downside to this is printing with smaller layer heights takes much longer for the object to print because the nozzle is having to complete many more travel moves.
(Each level represents a single layer on both sides. You can see how far off out each layer must travel on the left. When the layer height is reduced on the right, a much smaller outward distance is traveled by each layer.)
Another option is to alter the object itself to include as little overhangs as possible that exceed 45 degrees. If you were the one who designed the part, that makes it very easy to go in and edit the original file. If the file is an object you found online, that makes it slightly more difficult to make the alterations you need. Having overhangs over 45 degrees is not a deal breaker, all it means is you will need to do a little more work getting the part to come out how you want it.
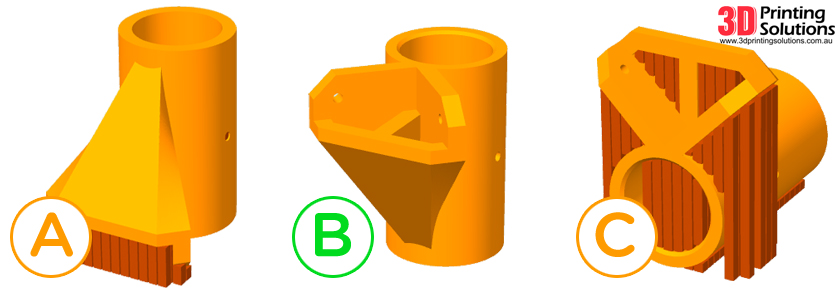
One more option is to experiment with the object’s orientation. Orientation is the position in which the object will rest on the print bed. By changing the objects orientation, you are also changing the overhang angles without altering the shape of the object. With certain objects, you may be able to remove all overhangs simply by changing the orientation.
Ex.
the vertical pillars represent support material. For A. there is very little support, but still some at the base. By rotating the object 180 degrees B. can print with no support at all, and no change to the objects shape. C. can still print, but it was rotated in such a way that even more support material is added than necessary, so be careful that you are printing in the best orientation possible.)
What are some problems with supports?
The biggest issue with supports comes with post-processing. Post-processing is the extra work you need to do to the object after it is done printing to make it look like it is supposed to. When printing with support, you need to manually remove it from the print, it does not simply go away when done. If your support settings are not well set, the support can almost seem glued to the object, and you can spend large amounts of time chipping that support material away until it is all off. If your settings are better set, then once you remove the object from your build plate you may be able to hold the object in one hand and pull the support material off in other with one motion. Dialing in you print settings takes time, along with trial and error, but once you can make it work for you it can save you a lot of time overall.
Ex.
Another issue is surface quality. Yes, support helps with drooping to improve surface quality, but it is also sticking to your object. Once that material is removed from the object, wherever the support was touching will leave a scar on the object from being pulled off. A way around this is to finish the surface with sandpaper/other abrasives or paint the object to smooth it out.
Lastly, one problem with supports is environmental. The support material, after being taken off the object, becomes waste and is thrown away. That is extra plastic that you are using that serves no function and goes straight into the trash after printing. That being said, the most common 3D printing filament is PLA, which is a starch-based plastic derived from plants, meaning it is biodegradable. This is not the case for most others however, so keep that in mind when printing with other types of materials.
One more Solution:
Some printers have more than one nozzle, meaning they can print more than one material at a time. There is water-soluble filament (meaning the filament can dissolve in water) that can be used as support material. You can print the object you want with one nozzle and material, while the water-soluble support material is printing through the other nozzle. Once the print is finished, you can take the entire print off the bed, place it in water, and the support material will dissolve away. This greatly reduces the hassle of post-processing and leaves a much better surface finish by eliminating the concern of scaring the surface when pulling the support material off the part. If this is a viable option for anyone with access to a dual head printer, I recommend this as the best way to print complex object and maintain the highest level of surface quality.
Ex.
(Right image is the object after support material is dissolved. Left image shows to water-soluble filament still attached to the object)
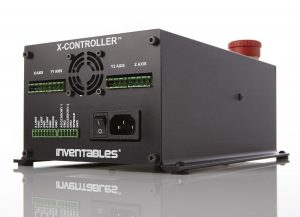
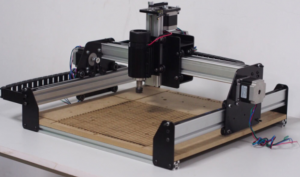
This blog post is about a CNC (Computer Numeric Control). When I joined the Makerspace, X-carve was called Shapeoko. It had a 500mm in XY and a 100mm in Z height. During the summer of 2019, I upgraded the Shapeoko to an X-Carve. It was a much better and efficient system. The upgrade involved taking apart Shapeoko completely and rebuilding from the ground up using different parts.
The main upgrade component was the drivers and the board for the CNC. The X-controller had motor divers and a motherboard built-in, which made the build a little easier. Then, we used stronger and better aluminum profiles to replace the current ones. The new profiles had dual rails so it can run two V-groove wheels on both sides. This improves precision and reduces friction within the axis.
Lastly, I used a 48V independent spindle. This makes it easier to control the spindle. Spindle specs are so much better than the standard X-carve spindle. The standard running RPM is 12,000. The upgrade is complete as of now, and X-carve had its first project lined up while it was in the works. UNT Libraries requested 50 Power outlet faces milled. X-carve successfully completed the whole project just after the day that it was built.
The Spark Makerspace offers many options for 3D printing. All of our printers use Fused Deposition Modeling, where the printer lays down hundreds of layers of molten plastic one at a time, slowly building up your model. This method of 3D printing was invented in 1988 and is one of the most popular forms of 3D printing in the consumer and maker communities. The plastic used by these printers come in the form of filament spools and can be made out of many different plastics, including ABS, PLA, and Nylon. Filaments can also contain additives for unique effects such as wood, metal, and carbon fiber. A few of the printers we use are Poly Printers, which are locally sourced 3D Printers that deliver fast, reliable, and accurate 3D prints. Poly Printer was founded in 2012 in Midlothian, Texas, and offers a few types of printers, including the 229 and 465dx models, which can print a variety of sizes and materials.
Stop by either of our 2 locations to use these printers and more!
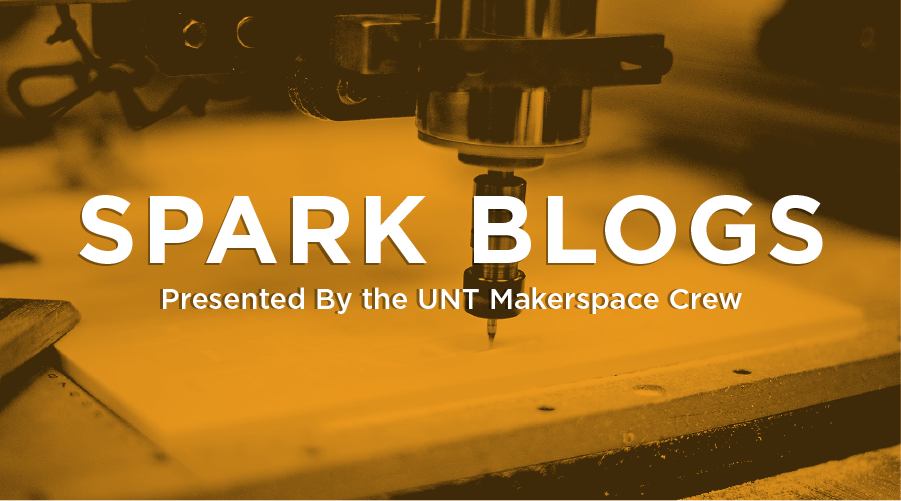
A Warm Welcome to Our Newest Machine, the Full Spectrum PS36 Laser Cutter.
A brief history on laser cutting:
The first working laser cutter was created in the 1960s by Western Electric, one of the forerunners of laser technology in manufacturing. Manufacturers soon began using lasers in their processes to allow for much faster production. Many advances have been made since then, such as metal cutting and glass etching. Today, we see more affordable options, better software support, and small-sized machines made specifically for makers. It truly has never been easier to get started with laser cutting.
Our laser cutter operates using CNC or Computer Numerical Control. This allows us to draft our designs on a computer program such as Adobe Illustrator or AutoCAD and upload them to the machine similarly to how a printer works. Laser cutting is accurate — the narrow beam of high energy light on our machine is merely 0.002”, or 0.05 mm. This is what makes laser cutting so unique: high accuracy and fast cutting of certain materials. Traditional methods such as saws and blades are not as fast, quiet, or clean. CNC combined with the highly accurate laser allows for intricate designs or even photo etching automagically.
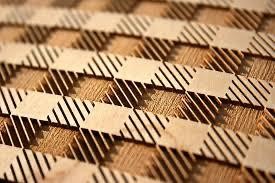
An example etching piece created on a laser.
Laser cutters are limited in the materials that are safe to use without an industrial filter system, but luckily this includes all types of wood, specific plastics, and most fabrics. Materials that are not safe are plastics such as PVC, vinyl, or ABS. These plastics are commonly used in manufacturing today, but release harmful chlorine gas or hydrochloric acid when burned. This is why, when working with plastics especially, it is important to know exactly what material you want to cut and if it is safe to use on a laser.
Hobbyists and makers have welcomed laser manufacturing with open arms, as they make an effective tool for a variety of uses. Wood burning and etching, carpentry, and other crafts can make use of the precisely controlled laser. Laser cutters are easy to use and setup, with very little clean up required. Makers unfamiliar with CNC can learn very easily through a laser with Adobe Illustrator or similar programs.
If you have any questions about laser cutting or want to get started, visit The Spark Makerspace in Willis library and talk to one of our skilled laser operators!


 Lastly, I used a 48V independent spindle. This makes it easier to control the spindle. Spindle specs are so much better than the standard X-carve spindle. The standard running RPM is 12,000. The upgrade is complete as of now, and X-carve had its first project lined up while it was in the works. UNT Libraries requested 50 Power outlet faces milled. X-carve successfully completed the whole project just after the day that it was built.