All posts by Judy

Making Across Generations

A UNT MindSpark Podcast episode in our Maker Mindset series.

Join the MindSpark Podcast team on a journey to explore maker mindsets across generations. We’ll speak to a multigenerational family who instilled a tinkering, explorative approach to navigating the world and mindset in their home. In this episode our guest will talk about the ways creating and making have influenced them and their family.


Hosted By JP Abah, Sound Production: Steven Sparkman

Guest: Raul Flores, Pamela Flores, Hanna Flores

Mirrex Weaving Looms

Written by: D. Da Costa Spark Specialist UNT Senior Mechanical and Energy Engineering

Hello there! If you are interested in weaving and weaving accessories, you are in the right place. Whether you are interested in large-scale weaving, or something smaller, here you can find information that will help you understand the weaving process with Mirrix Looms.

Mirrix Loom with Sheading Device

At the UNT Spark, we have 2 Mirrix weaving looms available for students to check out. Here we have our 16-inch big sister loom and 12-inch little guy loom, which are perfect for a wide variety of projects. Seen in the image below is our 16-inch loom, which is better for larger projects, and our 12-inch loom, more suitable for smaller projects.

16” Big Sister Loom Located at The Spark

12” Little Guy Loom Located at The Spark

Before diving into the process of weaving, it is important to know all the pieces included in the weaving loom and their purpose.

Labeled Parts in Mirrix Kit for Reference

First, we have the main body of the loom, which includes the top beam, warp coil tray, copper sidebars, wooden clips, threaded rods, wing-nuts, bottom beam, and fold-out legs. It is important to note that this set-up will be the same for the two sizes of looms provided by the Spark, and this is the main piece of equipment needed for weaving.

The next important piece of this assembly is the shedding device. Although it is optional to use during the weaving process, it is a great tool for those who are just starting and simplifies weaving. The purpose of this shedding device is to separate top and bottom warp threads for the weft to be woven through. This device will sit in the slots on the wooden clips and be held in place by the small circular discs on the wooden clips. To activate the shedding device, a shedding device handle will be used to move the warping thread forward and backward.

Following this is the warping and spring bar. The warping bar is basically where you will loop your warping threads to complete your warp. Not only will the warp loop around the bar, but also the main body. Additionally, the springs located at the top and bottom of the main body will be used for separating the warping threads an equal distance apart, and a spring bar will be used to hold the thread down while in the spring.

Warp and Weft are the thread/yarn being turned into fabric through the weaving process. Warp is usually longitudinally placed in tension on the main body of the loom and remains stationary throughout weaving. Weft is the thread being woven in a transverse direction over and under the warp threads. These are the main components that transform the thread into fabric.

Visual of Warp and Weft Threads

Finally, the last piece of equipment utilized in this kit is heddles. Heddles are attached to each warp thread on the loom and connect the warp to the shedding device.  Heddles are the tool used to bring the warp thread pattern in and out, making them a key piece of equipment when using the shedding device. The great thing about heddles is that they are easy to make out of thread or cord, so if you run out you can always make more.

Heddles on Shedding Bar

It is best to familiarize yourself with all the equipment provided in the Mirrix kits for a successful looming experience. Learning about the loom base, shedding bar, heddles, warps, and wefts is a great place to start before weaving.

If you have any questions or want to get started weaving, head over to The Spark located in room 135 at Willis Library and talk to one of our specialists or email us at thespark@unt.edu. Thank you!

Support on 3D Prints

What are supports?

Supports are extra plastic material printed on or around the object you are printing to help make it print and look better.

Example:

When do you need supports?

It is best to use supports when printing an object that has overhangs greater than 45 degrees. Overhangs are a diagonal part of the print where some of the top layer is printed on top of the bottom, and the rest goes past the previous layer with nothing underneath. The steeper the overhang means more material will be printed with nothing under it, causing it to droop, and create a poor surface of the part. Supports give the part something to for the object to print on when it moves past the previous layer. This holds up the parts to reduce the drooping effect as much as possible and allow the object to retain its intended shape.

Overhang example:

Drooping effect:

Object with overhang (without and with support):

How to reduce supports?

Supports are useful, but they increase the time it takes to print an object and increases the amount of material you must consume per part. Reducing supports can help save you time, material, and money. Here are some ways to reduce supports for your parts:

One option is to reduce the layer height you are printing the object with. Layer height is the vertical thickness of each individual layer of the print. When you have a smaller layer height, the layer does not have to extend as far out with each layer when there is an overhang. This makes printing the overhang easier for the printer without support because more of the layer will be printed on the layer before it, improving quality. The downside to this is printing with smaller layer heights takes much longer for the object to print because the nozzle is having to complete many more travel moves.

(Each level represents a single layer on both sides. You can see how far off out each layer must travel on the left. When the layer height is reduced on the right, a much smaller outward distance is traveled by each layer.)

Another option is to alter the object itself to include as little overhangs as possible that exceed 45 degrees. If you were the one who designed the part, that makes it very easy to go in and edit the original file. If the file is an object you found online, that makes it slightly more difficult to make the alterations you need. Having overhangs over 45 degrees is not a deal breaker, all it means is you will need to do a little more work getting the part to come out how you want it.

One more option is to experiment with the object’s orientation. Orientation is the position in which the object will rest on the print bed. By changing the objects orientation, you are also changing the overhang angles without altering the shape of the object. With certain objects, you may be able to remove all overhangs simply by changing the orientation.

Ex.

the vertical pillars represent support material. For A. there is very little support, but still some at the base. By rotating the object 180 degrees B. can print with no support at all, and no change to the objects shape. C. can still print, but it was rotated in such a way that even more support material is added than necessary, so be careful that you are printing in the best orientation possible.)

What are some problems with supports?

The biggest issue with supports comes with post-processing. Post-processing is the extra work you need to do to the object after it is done printing to make it look like it is supposed to. When printing with support, you need to manually remove it from the print, it does not simply go away when done. If your support settings are not well set, the support can almost seem glued to the object, and you can spend large amounts of time chipping that support material away until it is all off. If your settings are better set, then once you remove the object from your build plate you may be able to hold the object in one hand and pull the support material off in other with one motion. Dialing in you print settings takes time, along with trial and error, but once you can make it work for you it can save you a lot of time overall.

Ex. 

Another issue is surface quality. Yes, support helps with drooping to improve surface quality, but it is also sticking to your object. Once that material is removed from the object, wherever the support was touching will leave a scar on the object from being pulled off. A way around this is to finish the surface with sandpaper/other abrasives or paint the object to smooth it out.

Lastly, one problem with supports is environmental. The support material, after being taken off the object, becomes waste and is thrown away. That is extra plastic that you are using that serves no function and goes straight into the trash after printing. That being said, the most common 3D printing filament is PLA, which is a starch-based plastic derived from plants, meaning it is biodegradable. This is not the case for most others however, so keep that in mind when printing with other types of materials.

One more Solution:

Some printers have more than one nozzle, meaning they can print more than one material at a time. There is water-soluble filament (meaning the filament can dissolve in water) that can be used as support material. You can print the object you want with one nozzle and material, while the water-soluble support material is printing through the other nozzle. Once the print is finished, you can take the entire print off the bed, place it in water, and the support material will dissolve away. This greatly reduces the hassle of post-processing and leaves a much better surface finish by eliminating the concern of scaring the surface when pulling the support material off the part. If this is a viable option for anyone with access to a dual head printer, I recommend this as the best way to print complex object and maintain the highest level of surface quality.

Ex.

(Right image is the object after support material is dissolved. Left image shows to water-soluble filament still attached to the object)

Written by: K. Mortensen

Spring 2021 Episode 1 UNT MindSpark

Welcome to the first podcast of the Spring 2021 semester. This podcast is hosted by The Spark student staff and each semester they delve in to a wide range of topics relating to innovation, making, tinkering and creativity. In this first episode, we introduce the plan for the Spring 2021 team. We hope you enjoy!

Hosted by J. Abah, Produced by S. Sparkman

The Spark Collection: Little Bits

Little Bits are kind of like legos, but for circuits. They were designed with the beginner circuit builder in mind. They are a platform of easy-to-use electronic building blocks that empower you to invent anything, from your own remote controlled car, to a smart home device. The Bits snap together with magnets, no soldering, no wiring, no programming needed. Each little Bit has one unique function such as lights, sounds, sensors, buttons, and with different combinations you can make circuits large or small. Little Bits allow you to create interactive projects without any background in engineering, programming or wiring, in just a few seconds. It’s as easy as snapping LEGO bricks together. And the best part is, its available for check out for The Spark Makerspace collection!

Meet Specialists Arthur

Hi! My name is Arthur Sliter and I’m a knowledge specialist here at the UNT Makerspace. I’m currently a freshman majoring in mechanical engineering and have a passion for all things technical. I especially love 3D printing since it enables me to create crazy and custom parts I need for my projects. I got my first 3D printer in 2013 and have been addicted ever since. As my major would imply, most of the projects I do are mechanical in nature but almost all have a dash of electrical engineering or computer science. I’ve always been fascinated with how things work, as a kid I would always take toys and old appliances apart to understand the designs and mechanisms that made them tick. Since then not much has changed, I’ve just gotten better at putting things back together.

For 3 years I ran the maker space club for my high school, teaching peers and even staff how to design projects, weld, use power tools, woodwork, and 3D print. I love guiding others through the engineering design process and watch as their ideas come to life. When I found out there was a position open at the UNT maker space I knew I had to apply.

After teaching myself circuit design and coding in Arduino I was able to bring out the full potential of my projects and started working with more mechatronics and robotics. Some notable projects I’ve worked on over the years are:

A bionic prosthesis I created for my capstone project as a senior in high school. The goal of this project was to fill the need for affordable prosthetics. The bionic arm uses an electromyograph to convert residual nerve signals into a command that opens and closes the 3D printed hand.

These are some science exhibits I created for the University of Texas at Dallas’ Science and Engineering Education Center during my employment. I love teaching and passing on knowledge so these were a blast to make. From left to right, demonstrating the buoyancy of pumice, the magnetic properties of magnetite, and the concept of herd immunity.

This is a home smart hub powered by IBM Watson AI for another school project in my junior year. This was designed to work with wireless and wired home devices and used Watson to improve energy efficiency and comfort by learning your routines.

My love for tech doesn’t stop at gadgets and robotics, this is a custom gaming PC I made with a hardline water loop, Ryzen 9 3900x, 32 GB of DDR4 ram, GeForce RTX 2070 Super for any PC nerds out there

This is another school project for my sophomore year sustainability project. This robot prototype was designed to skim the surface of oceans and lakes picking up trash and other floating debris. GPS telemetry allowed the robot to clean a determined area and dock at a specialized barge when it was full. Only one was made but they were meant to work as a swarm configuration.

Written By: A. Sliter

Maker Mindset: What is a Makerspace?

Makerspaces are a technology-focused subset of the DIY culture. Before Makerspaces, there were what are known still as “hackerspaces”, which were first organized in Germany. The idea of a physical gathering of hackers spread to the United States via interaction at a conference, and the first United States hackerspaces were founded (some still in operation) in New York City.

Eventually, there came to be a division between what some hackerspaces were hosting; some stayed focused on hacking, altering electronic components for other purposes, and innovating on boards and code. Others chose to integrate other interests, with interests in design, woodcutting, sewing/textiles, metal-smithing, etc. These spaces became known by the term “makerspace”, where members could physically meet, collaborate, and work together outside of a narrow context like their jobs, single skills set, or group.

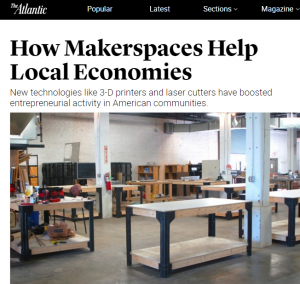
Makerspaces are inherently inclusive, innovative, and educational. And a serious plus is that now people don’t have to buy and store things like giant laser cutters, CNC milling machines, and 3d printers in their homes! The original feeling of the hacker culture, that agency to play and change something, mixed with the hands-on myriad of other material and skills interests found in the DIY culture, culminating in makerspaces like the Spark at UNT!

The maker movement has been growing in education from k-12 through college and the public sector. The interesting and challenging aspect of a maker space is that they are grouped together around an ideology more so than a specific physical make up. Makerspaces, are generally agreed to be a social or lab space dedicated to the process of hands on learning, tinkering, investigating and making. Makerspaces can have a wide range of setups and therefore the definition can be just as varied:

Laura Fleming –   “A makerspace is a metaphor for a unique learning environment that encourages tinkering, play and open-ended exploration for all.”

Diana Rendina –  “A makerspace is a place where students can gather to create, invent, tinker, explore and discover using a variety of tools and materials.”

John J Burke –  “A makerspace is an area in a library where users can use tools and equipment to design, build, and create all sorts of different things.  It may be a dedicated room or a multipurpose space in which a collection of raw materials and resources can be utilized as desired. Projects range from prototyping product designs with 3D printers, to programming robots, to creating art out of recycled items.”

Colleen Graves – ” A makerspace is not only a place where you can make stuff but many times its a place where you make “meaning” which many times is more important than the stuff you make.”

Ann Smart – “A space with materials for students to let their curiosity and imagination come to life.   An informal, playful, atmosphere for learning to unfold.   A space where making, rather than consuming is the focus.   A space where trans-disciplinary learning, inquiry, risk-taking, thinking, crafting, tinkering, and wondering can blossom.”

TheRSA.org –  “Makerspaces are open access workshops hosting a variety of new and old tools – from 3D printers and laser cutters to sewing machines and soldering irons.  Makerspaces are more than just sites to craft objects. They are also places to experiment with a different way of living – one that responds to the challenges and opportunities of a world in which technology is ubiquitous.”

i3Detroit.com –  A Makerspace is  “a collision of art, technology, learning, and collaboration”

Mad-Learn.com –  “A makerspace is a place that provides creative time and space for people of all ages to build prototypes, explore questions, fail and retry, bounce ideas off one another and build something together. These spaces don’t always include technology, since some prototypes and designs can be built out of anything or may include various stages of design that move from analog to digital and back again, but many do include technology. Now, with 3D printing and design, makerspaces are really taking off.  Kids gather in a common area to design and ideate on 3D printing projects.   The makerspace becomes a safe area where creativity and risk-taking becomes common practice.”

Techtarget.com – “A makerspace is a community center that provides technology, manufacturing equipment and educational opportunities to the public.  Makerspaces allow community members to design, prototype and manufacture items using tools that would otherwise be inaccessible or affordable such as 3-D printers, digital fabrication machines and computer-aided design (CAD) software.  Makerspaces are typically funded by membership fees or through affiliations with external organizations, such as universities, for-profit companies, non-profit organizations and libraries.  The free exchange of ideas and resources is a central tenet of makerspaces.  Often, members of different makerspaces will collaborate on projects and share knowledge at gatherings known as build nights or open-house days.”

Bozeman Makerspace –  “A Makerspace / Hackerspace allows groups of people to pool resources and create a community of people with varied interests. These interests may include but are definitely not limited to: circuitry, robotics, soldering, woodworking, fabricating, programming, networking, hacking, bending, etc.”

Room 6KGH.com –  “A makerspace is simply a place where people gather and make.  They come all shape and size.  A makerspace is a student centered learning environment with limitless possibilities.”

Educause.edu – “Makerspaces are zones of self-directed learning. Their hands-on character, coupled with the tools and raw materials that support invention, provide the ultimate workshop for the tinkerer and the perfect educational space for individuals who learn best by doing…they promote multidisciplinary thinking and learning, enriching the projects that are built there and the value of the makerspace as an educational venue.”

Libraries & Maker Culture –  “Makerspaces which are sometimes called hackerspaces–can be any area where people gather to make and create. These spaces often include 3D printers, but do not necessarily have to.  In makerspaces, people share supplies, skills, and ideas, and often work together on projects.  Makerspaces grew out of maker culture–a group of people dedicated to craftsmanship and creation. Makerism focuses on DIY projects, and makers value creation by individuals or small groups rather than bulk production. In general, makerism is also a culture of creation over consumption.”

Library as Incubator – “Makerspaces are collaborative learning environments where people come together to share materials and learn new skills.  Makerspaces are not necessarily born out of a specific set of materials or spaces, but rather a mindset of community partnership, collaboration, and creation. ”

OEDB.org –  Makerspaces, sometimes also referred to as hackerspaces, hackspaces, and fablabs are creative, DIY spaces where people can gather to create, invent, and learn. In libraries they often have 3D printers, software, electronics, craft and hardware supplies and tools, and more.


Meet Maker Cameron

“My name is Cameron Driller. I am a biochemistry major in my third year at UNT with minors in biology and technical writing. I first discovered the Factory as part of a job search after I decided that I NEEDED to get out of previous call center job, and I’ve been working here as a Maker for going on three years now. I’ve worked in “hands-on” workplaces before but never one that focused on DIY which is what really peaked my interest.
I work mostly on the 3D printing and science tools in space. Since I’m the only science major out of all my coworkers, I get called on anytime those tools are of interest. This setup is perfect for me because I get to work with sensors on all kinds of projects and then teach others on how to use them. This work combined with the 3D printing aspect means that I get to play with designs that have benefit to people. Designs that could range from automating greenhouses to articulated robotic limbs.”