Tag Archives: serger

Easy Project Ideas

Lastly, what are some easy projects I can do to get started?

https://www.allfreesewing.com/Miscellaneous-Projects/Serger-Basics-Serger-Sewing-Projects-NSM2018

This link here is to the website I found these project on but I will also list them here;

Insanely Easy Silk Infinity Scarf

https://www.allfreesewing.com/Accessories-to-Sew/Insanely-Easy-Silk-Infinity-Scarf

“This Insanely Easy Silk Infinity Scarf tutorial is a two-for-one. Firstly, and most importantly, you get a gorgeous infinity scarf sewing pattern, and secondly, you’ll learn how to sew a hem with the overlock technique if you have a serger. If not, the tutorial also includes instructions for regular sewing machines. This silk scarf is amazingly easy to make and will keep you looking fabulous even in the coldest winter months. Whether you use a frayed edge or a rolled hem, this scarf will brighten up any winter outfit!”

Project Type: Learn a Technique

Time to Complete: In an evening

Sewn by: Machine

Downton DIY Headband

https://www.allfreesewing.com/Sewn-Hair-Accessories/Downton-DIY-Headband

“For you or other fans of the hit program, add this Downton DIY Headband to your list of easy-to-make gifts. Free vintage sewing patterns like this one look like an heirloom but can be made from a ribbon and serger. This DIY headband is reminiscent of styles that have sailed through centuries. Whether you’re dressed up or down, this sewn accessory will top your ensemble off with a romantic touch, and it only takes under an hour to make.”

Project Type: Make a Project

Time to Complete: Under an hour

Sewn by: Machine

No Pattern T-shirt and Dress

https://www.allfreesewing.com/Dress-Patterns/No-Pattern-T-shirt-and-Dress

“This project is ideally suited to those who are just getting started with their serger. It is quick to sew and easy to wear and combines both the use of the serger and the sewing machine. Made using forgiving jersey, you can choose the length to make either a dress or a t-shirt, both ideal summer makes. You could use heavier weight jersey or even stretch denim to make autumn/winter versions too. The tutorial is written by sewing author, teacher and pattern designer Wendy Ward.”

Project Type: Make a Project

Time to Complete: In an evening

Sewn by: Machine

That is all! Thank you for reading this long blog post!

-Tryston

Written By: T. Bruner

General Advice && FAQ – Serger

General advice

  • Use a bit of thread wax to stiffen the ends of the thread to make it easier to thread the needles and loopers.
  • THIS ONE IS IMPORTANT: It is possible to rethread your loopers by ‘tying on’ a new thread. Snip the upper looper and lower looper threads between the thread tree and tension disks. Replace the spools, tie the new thread to the old with a small overhand knot, and pull through the loopers.
  • Also, just a reminder! If you are running short on thread cones, you use thread spools in your needles. You can even wind your own threads spools from your serger cones!
  • Buy good quality thread
  • Serger can’t backstitch (Well, in fact, it can… but you will not desire to do so, because it will cut your newly made stitches!)
  • IMPORTANT! Never Sew on Pins! Your needle will break! and either hit you in the face or fly off somewhere. Also, you will have to buy another double needle!
  • A Serger goes faster than a sewing machine (a.k.a: don’t push down your foot!)

FAQ

Do I have to have a serger?

Well, it depends on what kind of sewing you do and how often you do it. You technically don’t even really need a standard sewing machine. Lots of people like to sew by hand. I don’t. I very much dislike hand sewing.

If crafting and sewing is just a hobby, and you don’t know if you’ll stick with it forever, a serger can probably wait, especially if you don’t have $200 to burn. You can always keep an eye out for used sergers on eBay or refurbished from amazon.

If you sew a lot for yourself or your kids, or anything else like in my case I am a fashion major in college, and on the side, I like to make costumes. Also! and you work with a lot of knits and stretch fabrics, a serger will make your life a million times faster and easier.

If you’d like to produce clothes or other sewn items for sale, a serger will make your stuff look more professional. Everything produced in stores uses a standard 4 cone serger.

So the short answer, in my opinion, is No.

What is overlocking? Are a serger and Overlocker the same thing? Is there a difference?

A serger and an overlocker are essentially the same things. These names are used interchangeably.

Overlocking is stitching the edges of fabrics ( one or more layers ) for hemming, edging, or seaming.

A Four / five thread serger forms a seam with a chain as well as overlocks the edges, so this serger is way more than a simple overlock machine.

Why do I need a Serger? What are the benefits I get in owning a Serger?

Serger finishes the seam and edges in one go – so saves a lot of your time

Serger stitch is best for sewing knits, being very flexible and stretchy

Narrow seams, overcast edges, rolled hems, blind stitched hems are all easy with sergers

How is a serger different from a sewing machine? When to use a serger vs sewing machine?

A serger cannot be a substitute for a sewing machine. You cannot topstitch, sew buttonholes, attach zippers or stitch corners with a serger.

But for its particular use, it is the best. it can make your sewing look top-notch. It sews, trims, and overlocks the edges fastly and conveniently in one go. You can use it as a very useful accessory which will make your sewing a lot easier and faster.

What are the different types of sergers available?

The sergers are categorized according to the number of threads they use to form stitches.

  • 2- thread overedge serger – This is an overlocking machine alone; it does not sew a seam.
  • 3 Thread Overlock serger – I would recommend this as a useful serger as it works seams and overlocks as well.
  • 3 / 4 Thread overlock serger – Here 3 thread stitch is made with an extra stitch down the middle. This is a very suitable one for sewing thin knits as well as woven cloth
  • 4 Thread overlock – This serger makes a seam with two thread chain stitch and then uses two threads to overlock the edges
  • 5 Thread overlock serger – This serger makes a seam with two thread chain stitch and then uses three threads to overlock the edges

What are the things to look for when buying a serger – Must-have features in your serger

  • How many threads are used in the serger? One, two, three, four, or five
  • Does the serger have a free arm?
  • A free arm is needed to easily sew all points of garments.
  • Is it easy to thread?
  • A sewing machine is a breeze to thread. But not so the serger. At first, you may find the instructions difficult to follow and difficult to remember. Ensure that the instruction manual of the serger has clear instructions to thread the machine easily and efficiently. Check that the serger comes with color-coded guides to thread properly.
  • Can you change the stitch width and length easily enough?.
  • Does it have other features like other types of stitches and is it easy to change between them?
  • The serger usually has an overlock & chain stitch. Check if your serger has other stitches you may need like a cover stitch or rolled hems, blind hem. Check whether you need them even if the machine has them. You should not be buying extra features that you may not even use after the first few times.
  • Does the serger feel stable when the machine is sewing or does it feel fragile?
  • Can the tension be adjusted easily enough?
  • Accessories along with the serger – Do they cost extra and how does it add to the cost?
  • Your serger will usually come with the following accessories – dust cover, travel case, accessory case, carrying handle. Verify that the serger accessories and the manual list match
  • Can the serger handle heavy fabrics or many layers of fabric?

Written By: T. Bruner

-Stay tune to the last post of the Serger Series: Easy Project Ideas-

Serger 101 Series – How to thread

How to thread a serger 

This may look intimidating but once you’ve done it and learned it, it is rather easy.

But here we go! Threading your serger starts with your thread! Since sergers feed the thread through the machine faster than a regular sewing machine; using spool caps and thread cone inserts are a must. Also, note that not all your cones have to match. If you cannot afford 4 cones of thread wind 3 bobbins with that same color and use those.

Now, pull your thread through the fully extended thread tree, and the thread guides above the tension disks.

Pull your threads through tension disks making sure they are well seated between the disks. I find it faster to do this for all 4 threads at once since I’m short and I have to stand up to reach the thread tree.

Here is the order you should be threading your loopers in;

1) Upper looper
2) Lower looper
3) Right needle
4) Left needle

***Note: Threading out of order will cause thread jams.

Turn your handwheel toward you until the upper looper is accessible.
Then, using your tweezers pull the thread through the eye in the upper looper.

Now the lower loopers, this one is personally the worst, but you will get through this I assure you!

Pull the thread through the lower looper thread guides.

Turn your hand wheel until you have access to the thread guides that are attached to the lower looper and pull your thread through the guides.

Now turn your handwheel until you see the left edge of the lower looper peeking out.

Use your tweezers to grab the thread and thread the eye or thread guide on the left side of the lower looper.

Now, using your tweezers again, bring your thread back to the right side of the lower looper.

Now things get a little tricky because we have to keep turning the handwheel to thread the lower looper, it’s easy to get the lower looper thread under the upper looper arm. This will cause the thread to jam every single time.

Also, we need to make sure the upper and lower looper threads do not cross.

The best way to do this is to turn the handwheel (always toward you) until the lower looper is above the upper looper. Then thread the lower looper. 

Pull the thread through the lower looper thread guides.

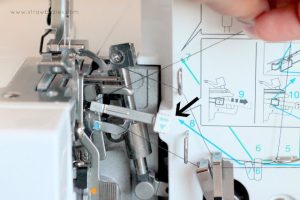
For this, pull out the small ‘threading lever’. Position the thread so it’s just resting against the lever as shown.

Push the lever back into place while holding the end of the thread.

Thread the eye of the lower looper, making sure not to cross threads with the upper looper. In other words, make sure that the lower looper thread is over the upper looper thread.

The lower loopers are done!

Threading the needles is the easy part. Thread the right needle first then the left needle second.

Make sure your thread is well seated in the tension disks, then run it through the thread guides.

Then pull the thread through the thread guide in front of the needle bar and then the needle.

Also before you get serging;
Just like with a sewing machine, I find it’s easier to start serging with a small piece of fabric under the presser foot– it helps keep the thread from being pulled back into the machine. After that, you should easily be able to make a thread chain.

If none of that made any sense here is a video tutorial.

https://www.youtube.com/watch?v=WThwuOfOSbg

Written By: T. Bruner

-Stay tune to the next post for general advice and a FAQ-

Serger 101 Series

Tryston here!  Today I’m going to explain what a serger is and help take the fear out of sewing with one!  I’ll also be answering some common questions!

What is a Serger? 

A serger is a sewing machine that binds fabric together with an overlock stitch. It uses 3-4 stitches to create the overlock stitch. This is the finishing stitch you see on many of your shirts and garments that you have around the house right now.

What does a serger do?

A serger trims the seam and encloses the seam allowance or edge of the fabric, inside a thread casing, all in one step. The width and density of the stitching are two of the many variables available on a serger. The options are not the same on all sergers. As with almost anything you purchase, the more you spend, the more options you will have. But mostly all basic sergers around the 200-300 range work perfectly for home use.

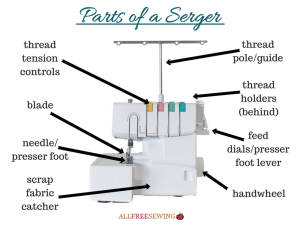
Part of a serger

The dials you see on top of the machine are the tension settings for your thread. From left to right, they are: 

  • left needle
  • right needle
  • upper looper
  • lower looper

**Please note that most sergers do look the same so even if you have a different type than this the chances are they will still be very similar to this.

Left of the machine.

  • Adjust the stitch width and length
  • Turn the knife on or off
  • The stitch width and length/ There are times when you may want to turn your knife off.

Inside:

  • The main thing that sets sergers apart from sewing machines is the loopers. These are located inside the machine and under the needle.
  • The loopers act like knitting needles, in that they overcast over the needle threads.
  • The loopers are threaded in a special sequence. 

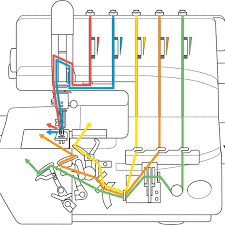
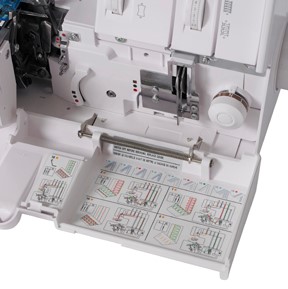
Many machines include a threading chart right on the machine, for an easy reminder when threading the serger.

Written By: T. Bruner

-Stay tune to the next post: How to thread a serger-