Category Archives: Maker Mindset

Easy Project Ideas

Lastly, what are some easy projects I can do to get started?

https://www.allfreesewing.com/Miscellaneous-Projects/Serger-Basics-Serger-Sewing-Projects-NSM2018

This link here is to the website I found these project on but I will also list them here;

Insanely Easy Silk Infinity Scarf

https://www.allfreesewing.com/Accessories-to-Sew/Insanely-Easy-Silk-Infinity-Scarf

“This Insanely Easy Silk Infinity Scarf tutorial is a two-for-one. Firstly, and most importantly, you get a gorgeous infinity scarf sewing pattern, and secondly, you’ll learn how to sew a hem with the overlock technique if you have a serger. If not, the tutorial also includes instructions for regular sewing machines. This silk scarf is amazingly easy to make and will keep you looking fabulous even in the coldest winter months. Whether you use a frayed edge or a rolled hem, this scarf will brighten up any winter outfit!”

Project Type: Learn a Technique

Time to Complete: In an evening

Sewn by: Machine

Downton DIY Headband

https://www.allfreesewing.com/Sewn-Hair-Accessories/Downton-DIY-Headband

“For you or other fans of the hit program, add this Downton DIY Headband to your list of easy-to-make gifts. Free vintage sewing patterns like this one look like an heirloom but can be made from a ribbon and serger. This DIY headband is reminiscent of styles that have sailed through centuries. Whether you’re dressed up or down, this sewn accessory will top your ensemble off with a romantic touch, and it only takes under an hour to make.”

Project Type: Make a Project

Time to Complete: Under an hour

Sewn by: Machine

No Pattern T-shirt and Dress

https://www.allfreesewing.com/Dress-Patterns/No-Pattern-T-shirt-and-Dress

“This project is ideally suited to those who are just getting started with their serger. It is quick to sew and easy to wear and combines both the use of the serger and the sewing machine. Made using forgiving jersey, you can choose the length to make either a dress or a t-shirt, both ideal summer makes. You could use heavier weight jersey or even stretch denim to make autumn/winter versions too. The tutorial is written by sewing author, teacher and pattern designer Wendy Ward.”

Project Type: Make a Project

Time to Complete: In an evening

Sewn by: Machine

That is all! Thank you for reading this long blog post!

-Tryston

Written By: T. Bruner

Landscape Photos

A Guide to Landscape Photos:

Landscape photography is a peaceful and relaxing way to spend time with nature and the great outdoors. This can be a great reason way to get out of the house during social isolation.

To take great landscape photos, first try scouting out an area you believe would make for a good composition. This can be done in person, or alternatively online through Google Street View. For gear, make sure to pack a wide angle lens and tripod, as well as anything you would bring on a hike. Make sure to plan out your shoot before heading out, as this can help save time later and usually leads to a better end product.

Landscape photos are most often done with a high depth-of-field to keep everything in focus, both near and far. This is achieved by using a high aperture setting. Most lenses can either go up to f/22 or f/16; combine these high apertures with the tripod to ensure a steady shot, as the camera will most likely need to be set for a longer exposure time. Once you are ready to shoot, make a couple test images and review them on-camera to troubleshoot unexpected issues. If you find that your images are blurry despite using a tripod, try turning on the self-timer to alleviate camera shake from pressing the shutter button. 

As always, make sure to be safe if going out alone. Bring plenty of water and pack a snack and first aid. Happy shooting!

Written By: The Spark Team

An Intro to Photography

Photography is a unique form of art, as it is both instantaneous and relatively new compared to mediums such as drawing or painting. These days almost everyone has a high quality camera on them at all times, and it’s as easy as ever to start honing in your image making skills!


To understand how an image is made, let’s first look at how a camera operates. There are three elements of an exposure or image: shutter speed, aperture, and sensitivity (or “ISO”). A perfect exposure or image balances these elements to make a photo that is neither too bright nor too dark. Shutter speed controls how long the “eye” or sensor of the camera is open to the scene it’s capturing, measured in fractions of a second. This effects motion blur on a moving subject. Aperture refers to the size of the hole through which light enters the camera.

On most smartphones this is a fixed size, but on professional DSLR cameras the size of the hole can be adjusted to allow more or less light through and changing the “depth-of-field” effect on the final image. This is a powerful effect that allows the photographer to isolate the background from the subject by shifting it out of focus, blurring it. Sensitivity or ISO effects how sensitive the sensor is to light and effects the grain or noise on the final image. These are the three elements of every photograph, and learning how to adjust them to your liking is a good first step to making amazing images.

Smartphone cameras and other types of digital cameras are most commonly used on an “auto” mode, where the camera decides how best to balance the elements of your photograph. While this is the fastest and certainly most convenient method, auto mode takes away most of the control the photographer has on their final image. Try testing out the three elements by switching your camera to manual (M) mode, where the photographer has control of every aspect of the camera. Smartphone users can find a “pro” or manual mode on many popular apps (such as VSCO), but note that aperture will most likely be fixed and unchangeable. Start by changing the ISO, bring it up to ‘6400’ or as high as it will go and change the other two elements to balance the exposure. Notice how suddenly noisy the image appears. Next set the ISO as low as it goes and change the shutter speed to 1/15. Take a photo of something moving and pay attention to how motion blur comes into effect. Those with a DSLR can change the aperture and see how it effects the background of the image when taking a photo of something up close. With these techniques in mind, it becomes much easier to troubleshoot an image if it isn’t coming out how you’d like.

Photography, like most everything else, relies on practice, practice, practice. Challenge yourself by taking your camera off auto and start making images. You might be surprised by how differently you take your photographs!

Written By: M. Heins

Photoshop

What’s Photoshop about?

Adobe Photoshop is a program for editing photographs, graphic design, digital art, and much more! It uses layering to allow complexity and versatility in the editing process and offers powerful editing tools that are capable of doing just about everything when used correctly.

Photoshop, or Lightroom, is it better? The truth is not that you compare the two programs, but that you define what you need for your project. Both are fantastic Adobe programs that provide excellent photo editing features. And why do you use Lightroom instead of Photoshop? Use both the simple way and use Photoshop when you can’t find Lightroom!

Photoshop CC

If you want more power over your photo editing, than you need Photoshop CC. It is the most robust and sophisticated program for photo editing. Photoshop CC is not designed exclusively for photographers.

You will work with 3D models and a qualified color control program on the Photoshop CC. Everything to remember certainly whether you want to print artwork, and not just pictures. The downside is that there’s a high learning curve at Photoshop CC. You do not know where to start as a beginner since there are so many tools and functions. However, as a beginner, you will be able to install the Previous Version of Photoshop and start simple modifications such as text editing, replacing the background, and so on so forth.

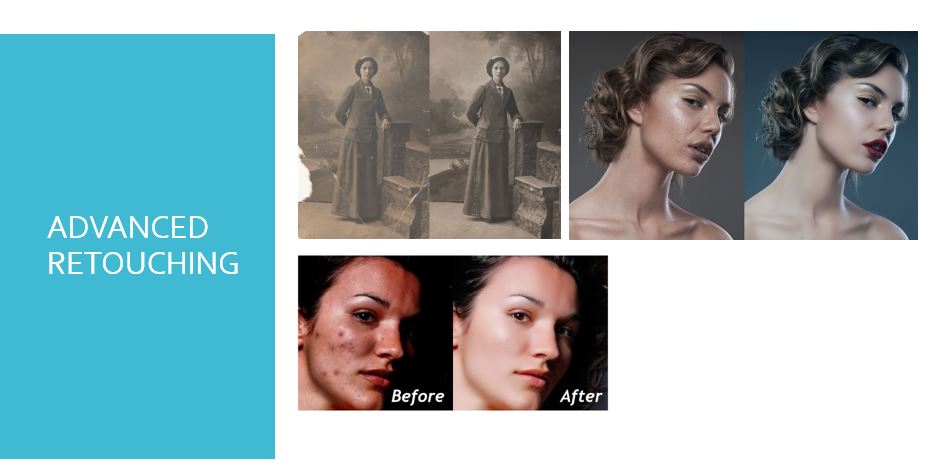
1. ADVANCED RETOUCHING

You need Photoshop if you want to make a leg shorter, an individual taller, or apply other elements to your frame. Also you can brighten and darken the skins, you can also able to put make-ups using on the photoshop without real make-up on women face.

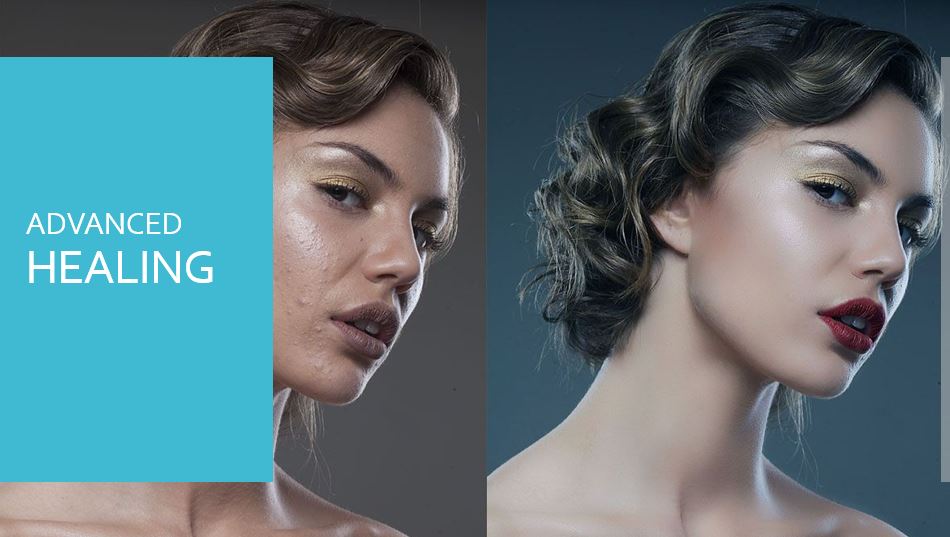
2. ADVANCED HEALING

When in Lightroom, you can replace small items and white teeth; the features aren’t as spectacular as using the magic-conscious material of Photoshop’s healing brush and patch software. The Content-Aware method helps Photoshop to search and examine the whole image as it tries to find out what the photo field would look like if the object were not there. It is still not flawless, and you will always (most likely) need to fine-tune the images with one of the other retouching tools from Photoshop until you have the result you want.

3. CREATIVITY

If you want to create a single creative picture using elements from various photographs, Photoshop is your choice. Again, Photoshop’s only constraint is the imagination! You may imagine an unrealistic world, and you can bring it to the designing, which looks like a real one.

4. KEEP CAPITAL!

You don’t have to hire someone to print your business cards, show posters, flyers, and more after you master Photoshop. You can create anything you want with Photoshop, whenever you wish. Start a new page and take advantage of your creativity.

5. MAKE MONEY

You can provide photo retouching services, design logos, open a graphic design company, build and sell PSD web templates, or start a website/YouTube channel where you make videos. Also, you can become a freelancer in the graphic designing category.

6. HUGE TOOLBOX

Every progressive release of Photoshop appears to bring increasingly useful tools into the mix. From content-aware loading, camera shake effects removal, lens filters, and automated panoramic image stitching, there is a resource for almost any job.

Written By: N. Dangalla

Making Across Generations

A UNT MindSpark Podcast episode in our Maker Mindset series.

Join the MindSpark Podcast team on a journey to explore maker mindsets across generations. We’ll speak to a multigenerational family who instilled a tinkering, explorative approach to navigating the world and mindset in their home. In this episode our guest will talk about the ways creating and making have influenced them and their family.


Hosted By JP Abah, Sound Production: Steven Sparkman

Guest: Raul Flores, Pamela Flores, Hanna Flores

Lenses

Lens selection is one of the most impactful aspects of an image, determining the compositional and visual characteristics for which the camera captures a scene. A photographer can use a wide variety of different lens selections to get the look they want to achieve.

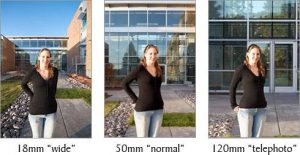
The first main category of lenses is the focal length, which affects the breadth and angle of the scene being captured. The focal length is measured in millimeters and is defined as the distance from the optical center of the lens and camera sensor. A longer focal length will lead to a narrower field of view, and vice versa. Knowing exactly how this works is not important to take photos, but it is helpful to pay attention to the perspective a particular focal length will capture. A wide-angle lens, most often identified by a focal length of 35mm and below, captures a large portion of the scene in front of the camera. Normal focal lengths, between 35mm and 50mm, will capture a scene almost exactly as the human eye. Beyond that would be the telephoto category, including 85mm and up. Telephoto lenses are often used to capture a subject that is far away or unreachable, for example, birds or other wildlife. This is because of their narrower field of view, zooming into the scene and magnifying a small section compared to what humans see. Check out this example of three different focal lengths all shot from the same position:

Keep in mind that wide-angle lenses will distort the final image, making them less ideal for portraiture where the subject’s face is the main focus.

The second category of lenses is zoom versus prime. A prime lens has a single, fixed focal length. Zooms are adjustable with the minimum and maximum focal length indicated on the adjustment ring, for example, 18-55mm or 150-300mm. Both types of lenses will take good pictures, though you may want to choose one or the other depending on the situation. Prime lenses tend to be much lighter and more compact, allowing for more portability. A street photographer or someone on vacation may find it easier to carry around. Zoom lenses have the advantage of many different focal lengths, effectively acting as many prime lenses in one. Zooms are, of course, much larger and heavier.

Choosing the right type of lens is one of the first steps to take when planning a shoot. Keep in mind how the subject and background will interact with your chosen lens. The appearance of the final image will depend on this one decision.

Written By: M. Heins

Maker Mindset: What is a Makerspace?

Makerspaces are a technology-focused subset of the DIY culture. Before Makerspaces, there were what are known still as “hackerspaces”, which were first organized in Germany. The idea of a physical gathering of hackers spread to the United States via interaction at a conference, and the first United States hackerspaces were founded (some still in operation) in New York City.

Eventually, there came to be a division between what some hackerspaces were hosting; some stayed focused on hacking, altering electronic components for other purposes, and innovating on boards and code. Others chose to integrate other interests, with interests in design, woodcutting, sewing/textiles, metal-smithing, etc. These spaces became known by the term “makerspace”, where members could physically meet, collaborate, and work together outside of a narrow context like their jobs, single skills set, or group.

Makerspaces are inherently inclusive, innovative, and educational. And a serious plus is that now people don’t have to buy and store things like giant laser cutters, CNC milling machines, and 3d printers in their homes! The original feeling of the hacker culture, that agency to play and change something, mixed with the hands-on myriad of other material and skills interests found in the DIY culture, culminating in makerspaces like the Spark at UNT!
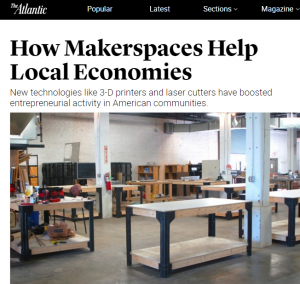
The maker movement has been growing in education from k-12 through college and the public sector. The interesting and challenging aspect of a maker space is that they are grouped together around an ideology more so than a specific physical make up. Makerspaces, are generally agreed to be a social or lab space dedicated to the process of hands on learning, tinkering, investigating and making. Makerspaces can have a wide range of setups and therefore the definition can be just as varied:

Laura Fleming –   “A makerspace is a metaphor for a unique learning environment that encourages tinkering, play and open-ended exploration for all.”

Diana Rendina –  “A makerspace is a place where students can gather to create, invent, tinker, explore and discover using a variety of tools and materials.”

John J Burke –  “A makerspace is an area in a library where users can use tools and equipment to design, build, and create all sorts of different things.  It may be a dedicated room or a multipurpose space in which a collection of raw materials and resources can be utilized as desired. Projects range from prototyping product designs with 3D printers, to programming robots, to creating art out of recycled items.”

Colleen Graves – ” A makerspace is not only a place where you can make stuff but many times its a place where you make “meaning” which many times is more important than the stuff you make.”

Ann Smart – “A space with materials for students to let their curiosity and imagination come to life.   An informal, playful, atmosphere for learning to unfold.   A space where making, rather than consuming is the focus.   A space where trans-disciplinary learning, inquiry, risk-taking, thinking, crafting, tinkering, and wondering can blossom.”

TheRSA.org –  “Makerspaces are open access workshops hosting a variety of new and old tools – from 3D printers and laser cutters to sewing machines and soldering irons.  Makerspaces are more than just sites to craft objects. They are also places to experiment with a different way of living – one that responds to the challenges and opportunities of a world in which technology is ubiquitous.”

i3Detroit.com –  A Makerspace is  “a collision of art, technology, learning, and collaboration”

Mad-Learn.com –  “A makerspace is a place that provides creative time and space for people of all ages to build prototypes, explore questions, fail and retry, bounce ideas off one another and build something together. These spaces don’t always include technology, since some prototypes and designs can be built out of anything or may include various stages of design that move from analog to digital and back again, but many do include technology. Now, with 3D printing and design, makerspaces are really taking off.  Kids gather in a common area to design and ideate on 3D printing projects.   The makerspace becomes a safe area where creativity and risk-taking becomes common practice.”

Techtarget.com – “A makerspace is a community center that provides technology, manufacturing equipment and educational opportunities to the public.  Makerspaces allow community members to design, prototype and manufacture items using tools that would otherwise be inaccessible or affordable such as 3-D printers, digital fabrication machines and computer-aided design (CAD) software.  Makerspaces are typically funded by membership fees or through affiliations with external organizations, such as universities, for-profit companies, non-profit organizations and libraries.  The free exchange of ideas and resources is a central tenet of makerspaces.  Often, members of different makerspaces will collaborate on projects and share knowledge at gatherings known as build nights or open-house days.”

Bozeman Makerspace –  “A Makerspace / Hackerspace allows groups of people to pool resources and create a community of people with varied interests. These interests may include but are definitely not limited to: circuitry, robotics, soldering, woodworking, fabricating, programming, networking, hacking, bending, etc.”

Room 6KGH.com –  “A makerspace is simply a place where people gather and make.  They come all shape and size.  A makerspace is a student centered learning environment with limitless possibilities.”

Educause.edu – “Makerspaces are zones of self-directed learning. Their hands-on character, coupled with the tools and raw materials that support invention, provide the ultimate workshop for the tinkerer and the perfect educational space for individuals who learn best by doing…they promote multidisciplinary thinking and learning, enriching the projects that are built there and the value of the makerspace as an educational venue.”

Libraries & Maker Culture –  “Makerspaces which are sometimes called hackerspaces–can be any area where people gather to make and create. These spaces often include 3D printers, but do not necessarily have to.  In makerspaces, people share supplies, skills, and ideas, and often work together on projects.  Makerspaces grew out of maker culture–a group of people dedicated to craftsmanship and creation. Makerism focuses on DIY projects, and makers value creation by individuals or small groups rather than bulk production. In general, makerism is also a culture of creation over consumption.”

Library as Incubator – “Makerspaces are collaborative learning environments where people come together to share materials and learn new skills.  Makerspaces are not necessarily born out of a specific set of materials or spaces, but rather a mindset of community partnership, collaboration, and creation. ”

OEDB.org –  Makerspaces, sometimes also referred to as hackerspaces, hackspaces, and fablabs are creative, DIY spaces where people can gather to create, invent, and learn. In libraries they often have 3D printers, software, electronics, craft and hardware supplies and tools, and more.