All posts by Alondra

Full Spectrum P Series

A Warm Welcome to Our Newest Machine, the Full Spectrum PS36 Laser Cutter.

A brief history on laser cutting:

The first working laser cutter was created in the 1960s by Western Electric, one of the forerunners of laser technology in manufacturing. Manufacturers soon began using lasers in their processes to allow for much faster production. Many advances have been made since then, such as metal cutting and glass etching. Today, we see more affordable options, better software support, and small-sized machines made specifically for makers. It truly has never been easier to get started with laser cutting.

Our laser cutter operates using CNC or Computer Numerical Control. This allows us to draft our designs on a computer program such as Adobe Illustrator or AutoCAD and upload them to the machine similarly to how a printer works. Laser cutting is accurate — the narrow beam of high energy light on our machine is merely 0.002”, or 0.05 mm. This is what makes laser cutting so unique: high accuracy and fast cutting of certain materials. Traditional methods such as saws and blades are not as fast, quiet, or clean. CNC combined with the highly accurate laser allows for intricate designs or even photo etching automagically.
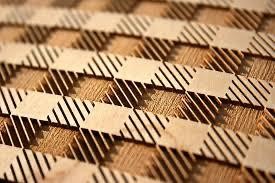
An example etching piece created on a laser.

Laser cutters are limited in the materials that are safe to use without an industrial filter system, but luckily this includes all types of wood, specific plastics, and most fabrics. Materials that are not safe are plastics such as PVC, vinyl, or ABS. These plastics are commonly used in manufacturing today, but release harmful chlorine gas or hydrochloric acid when burned. This is why, when working with plastics especially, it is important to know exactly what material you want to cut and if it is safe to use on a laser.

Hobbyists and makers have welcomed laser manufacturing with open arms, as they make an effective tool for a variety of uses. Wood burning and etching, carpentry, and other crafts can make use of the precisely controlled laser. Laser cutters are easy to use and setup, with very little clean up required. Makers unfamiliar with CNC can learn very easily through a laser with Adobe Illustrator or similar programs.

If you have any questions about laser cutting or want to get started, visit The Spark Makerspace in Willis library and talk to one of our skilled laser operators!

Written By: M. Heins

Debugging and Finalizing- Part 2

To finalize and remove any discrepancies in our code, it is best to get rid of any unnecessary code. For example, to test the solving function, I had a test board with fixed values. One important rule is to never hardcode or fix values. This is fine for testing; however, we want the user to have full control to ensure future usability.

We also want to shorten and optimize our code. From the beginning, I emphasized that functions were the best way to code. It is much faster to debug specific areas in our code. We can also simplify things by utilizing object-oriented programming. We can have a functions file and the main driver on another main file. This will make our code easier to test, read, and optimize. Since we have a better understanding of our code and the project, many functions can be simplified. It is good practice to take breaks and step away during this step. It is easy to later question why you made some functions more complicated than they should be.
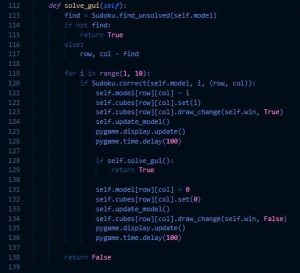
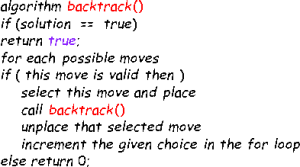
Now that our code is clean and debugged, we can add a Graphical User Interface. We are using a library called PyGame, widely used in Python for small games and early game development. A library adds lots of predefined functions that we can utilize. First, we will draw our board using simple statements in PyGame. Since we have already determined what the user can do, we have a roadmap. We will use the same functions, but modify them for our board. We must create a sketch, draw, select, place, clear, and an update function. We can also create a nice GUI update to show our backtracking algorithm. PyGame has useful draw and event functions for keyboard presses and formatting. The two screenshots are of my previous code and the updated GUI code with PyGame.
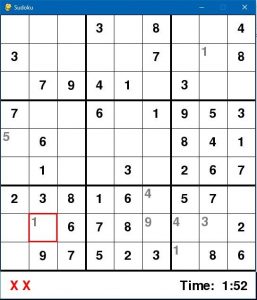
The left screenshot is my outcome. I allowed the user to play and have the solving algorithm run if they choose. I created an executable and setup wizard as well so others can download and install the game using a simple plugin installed similar to PyGame called Cx_Freeze. With this, I can change the logo of the executable, create a setup wizard, and so much more. I hope you enjoyed coding this project with me and implemented new functionalities to your liking.
Written By: P. Friedman

Coding-Part 1

To begin, we will write our code in an ideal editor. I am going to use Visual Studio Code because it has a nice design and useful extensions to help increase the workflow. However, something as simple as Notepad is enough.

We will need multiple functions to keep things clean. When coding, it is a good practice to indent your loops and functions cleanly and intuitively as it is easier to read. It is also important to use unique but informative comments and variable names. Naming a variable or a function, “A, A1, B, B1, B2,” is never helpful to you or anyone reading your code. This will ensure quicker debugging instead of staring at your screen for hours because you forgot about a semicolon.

Now that we have an environment, we can work on coding. Since we have a basic idea of Sudoku and what functions a user can do, we will first make the board. The board is a simple matrix, and we will initialize all the values to zero. We will make a print function for it as well for easy debugging.

To create a new unique solvable board, we must work backward. Sudoku is solved when all numbers counting 1-9 are entered and the constraints are passed. As we know, the constraint is that two numbers cannot be in the same row, column, or 3×3 grid. We can do this by implementing the backtracking algorithm. We will be able to make sure a given board can be solved and increase/decrease difficulty per the amount of numbers shown.

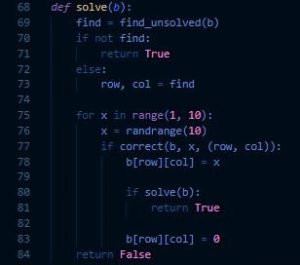
The backtracking algorithm is simple. Look for an unanswered spot on the board, pick a number, and continue forward. If there is a conflict, go back to where the problem occurs, and pick a different number. Then keep repeating the process until the board is completely solved. We must make sure to do this algorithm with time complexity in mind. If we do not check for the constraints first and instead test every number from 1-9, it will take a long time as this is very inefficient. This can be similar to the brute force algorithm. Every box has a possibility between 1 through 9. Therefore, we would have to test a maximum of 9^81 values as simple probability suggests.

Once we have made a function for solving the board and checking for an unsolved spot, we can continue. The algorithm will create new unique boards by itself. We will have to keep the solved solution so we can test the user on it later. Some numbers can be revealed by picking a random spot in the empty table and copying that same spot on the solution to show up onto the unsolved board. We can do this as many or as little times as we want. Now that we have the unique unsolved user board and the solved solution, we can start on the GUI or the Graphical User Interface.

Written By: P. Friedman

Prusa 3D Printers

Prusa Research was founded in 2012 by Josef Prusa. The company started as just himself with no outside funding and quickly began to grow into a now 500-person company with over 9,000 printers running at the Prusa factory. His original i3 design for the printer became one of the most popular 3D printer designs due to its open-source nature. They have become the fastest-growing tech company in Western Europe with a growth rate of 17,118% over the last four years. The largest reason for the company’s success is the decision to remain a completely open source. All the firmware, models, circuit board designs, and blueprints have been made public for people to customize, improve, and tinker with to make the product their own if they care to do so. Prusa has managed to be a leader in 3D printing innovation and design because of this principle. This allows people within this community to build off the work of those that came before them, instead of constantly having to work from the ground up. There are countless other 3D printing companies and designs out there, but you would be hard-pressed to find a printer that is not based on or highly influenced by the work of Prusa. Prusa Research has managed to play one of the largest roles in innovation for the 3D printing community in such a short amount of time, and it has been one of the largest contributors to the progression of 3D printing today.

Written By: K. Mortensen

Film vs Digital Cameras

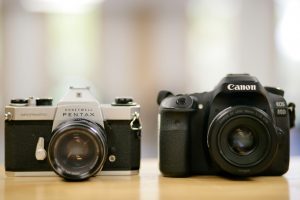
Film and digital cameras work similarly, but with slight advancements for digital such as autofocus and smart auto-exposure settings. The basic concepts for exposure are exactly the same (swapping film for a digital sensor). If you can operate a digital camera in manual mode, there’s a good chance you would do well on film without much extra practice. Finding a working film camera can be difficult, but if you research and make careful observations, there are tons of working, used cameras out there. Film is still for sale on many online retailers, and you can send it to a lab for processing in as little as a week.
Now is the best time to shoot film, as everything is much cheaper than it ever was. Professional-grade equipment can be purchased for pennies of what it used to cost. Digital photography is instantaneous, yet this advantage might also work against new photographers. When every shot costs up to $2, the photographer values each photo more than if it were on digital, because there is not an unlimited amount of storage. There might be a maximum of 32 shots on a roll of film, or as little as 24. This leads to each image becoming more thoughtful and planned, rather than a single shot picked out of hundreds. Film cameras make a photographer think about what they are looking at, how the subject looks in relation to the background, and the overall composition. In other words, film makes beginners better at photography.
A few notes on using film cameras:
Film cameras rely on a working light meter, so it is important to test yours to make sure it works. Working without a light meter is a complete guess, but you can use the rules of Sunny 16 (https://en.wikipedia.org/wiki/Sunny_16_rule) to get a somewhat accurate exposure. This is also a great way to know if your light meter is accurate, it should follow the rule as well. Film cameras also rely on film, which is highly sensitive to light. Even opening it slightly in bright light is enough to ruin it, so make sure to take care when inserting and removing film from the camera. Many old cameras made during or after the ’80s rely on small batteries, so make sure to replace those before taking photos.
Starting with film can be daunting, but as soon as you get to know the placement of the buttons, dials, and switches, one can use a film camera just as naturally as a DSLR. If you want to up your photography game and keep film alive and well, go pick up a cheap film SLR and try it out.

Written by: M. Heins

Down to the Coffee Basics

There are many different ways to prepare and brew coffee, rather than just putting it in the coffee maker and pressing start. Here I will introduce you to some of the different ways coffee can be brewed, and the different types of coffee you can use.

The most common method is the drip method. This is the same type as the coffee maker most people have experienced if you are a coffee drinker. This is one of the easiest and most accessible ways of brewing for most people. This process involves placing the coffee ground into the filter, adding the amount of water you want, and more or less pressing a button to allow the machine to       automatically brew the coffee for you.

After this, a French press is also a common method of brewing. Here, you mix more coarse ground with hot water and let it sit for several minutes. Then, you will press the grounds down to the bottom with a strainer and pour the coffee out. The coffee will taste stronger and smoother through this method than the drip method, this is because no filter is being used in a French press. Coffee beans contain several acids that benefit the digestive system, but most do not pass through the filter when it is being used. The French press eliminates this, allowing the acids to stay in the coffee when you drink it, which creates a noticeably different flavor.

Chemex is an hourglass-shaped glass that holds a filter on the top half, and hot water is poured through to the bottom half. They end up holding about a 32oz. of coffee when filled up. The coffee brews similar to the process of a drip coffee but is poured by hand allowing for a more careful pour to create a better-tasting end product. Chemex coffee is very smooth to drink, and a refreshing enjoyable experience that does not hit you as hard with the caffeine effects as over methods in my experience. If poured properly, and using quality coffee beans, this is one of my favorite methods of drip coffee.

V60 is a funnel-shaped apparatus in a V-shape at a 60-degree angle (hence V60). There are ridges on the inside of the funnel to help ensure an even flow of water throughout the coffee and into the container. The main differences between a V60 Pour Over and a Chemex is grind size, filter paper thickness, amount of coffee made, how long it takes for the coffee to drain and the ultimate taste of the coffee. (Courtesy of https://www.craftcoffeeguru.com)

Along with drip coffee, there is also espresso. Espresso requires its own type of beans to produce the desired flavor and requires an espresso machine to produce. These machines can range from a few hundred dollars for the home, to thousands of dollars for professional coffee shops. A shot of espresso is made by forcing about 1.5 ounces of nearly boiling water through tightly packed, finely ground espresso coffee. This creates a very strong and concentrated coffee. After making the shot of espresso, you can either drink it as is or use it to create a variety of other espresso-based drinks.
(Courtesy of https://recipes.howstuffworks.com/question645.htm)

Written by: K. Mortensen