To begin, we will write our code in an ideal editor. I am going to use Visual Studio Code because it has a nice design and useful extensions to help increase the workflow. However, something as simple as Notepad is enough.
We will need multiple functions to keep things clean. When coding, it is a good practice to indent your loops and functions cleanly and intuitively as it is easier to read. It is also important to use unique but informative comments and variable names. Naming a variable or a function, “A, A1, B, B1, B2,” is never helpful to you or anyone reading your code. This will ensure quicker debugging instead of staring at your screen for hours because you forgot about a semicolon.
Now that we have an environment, we can work on coding. Since we have a basic idea of Sudoku and what functions a user can do, we will first make the board. The board is a simple matrix, and we will initialize all the values to zero. We will make a print function for it as well for easy debugging.
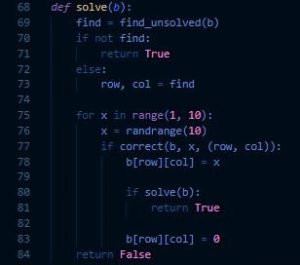
To create a new unique solvable board, we must work backward. Sudoku is solved when all numbers counting 1-9 are entered and the constraints are passed. As we know, the constraint is that two numbers cannot be in the same row, column, or 3×3 grid. We can do this by implementing the backtracking algorithm. We will be able to make sure a given board can be solved and increase/decrease difficulty per the amount of numbers shown.
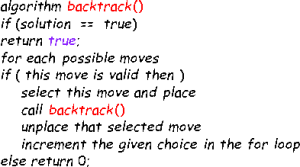
The backtracking algorithm is simple. Look for an unanswered spot on the board, pick a number, and continue forward. If there is a conflict, go back to where the problem occurs, and pick a different number. Then keep repeating the process until the board is completely solved. We must make sure to do this algorithm with time complexity in mind. If we do not check for the constraints first and instead test every number from 1-9, it will take a long time as this is very inefficient. This can be similar to the brute force algorithm. Every box has a possibility between 1 through 9. Therefore, we would have to test a maximum of 9^81 values as simple probability suggests.
Once we have made a function for solving the board and checking for an unsolved spot, we can continue. The algorithm will create new unique boards by itself. We will have to keep the solved solution so we can test the user on it later. Some numbers can be revealed by picking a random spot in the empty table and copying that same spot on the solution to show up onto the unsolved board. We can do this as many or as little times as we want. Now that we have the unique unsolved user board and the solved solution, we can start on the GUI or the Graphical User Interface.
Written By: P. Friedman

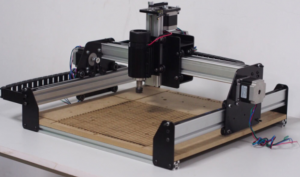 Lastly, I used a 48V independent spindle. This makes it easier to control the spindle. Spindle specs are so much better than the standard X-carve spindle. The standard running RPM is 12,000. The upgrade is complete as of now, and X-carve had its first project lined up while it was in the works. UNT Libraries requested 50 Power outlet faces milled. X-carve successfully completed the whole project just after the day that it was built.


 We also want to shorten and optimize our code. From the beginning, I emphasized that functions were the best way to code. It is much faster to debug specific areas in our code. We can also simplify things by utilizing object-oriented programming. We can have a functions file and the main driver on another main file. This will make our code easier to test, read, and optimize. Since we have a better understanding of our code and the project, many functions can be simplified. It is good practice to take breaks and step away during this step. It is easy to later question why you made some functions more complicated than they should be.
 Now that our code is clean and debugged, we can add a Graphical User Interface. We are using a library called PyGame, widely used in Python for small games and early game development. A library adds lots of predefined functions that we can utilize. First, we will draw our board using simple statements in PyGame. Since we have already determined what the user can do, we have a roadmap. We will use the same functions, but modify them for our board. We must create a sketch, draw, select, place, clear, and an update function. We can also create a nice GUI update to show our backtracking algorithm. PyGame has useful draw and event functions for keyboard presses and formatting. The two screenshots are of my previous code and the updated GUI code with PyGame.
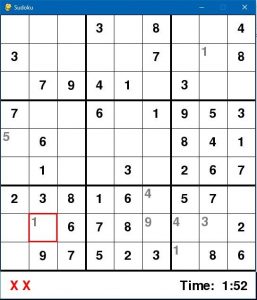 The left screenshot is my outcome. I allowed the user to play and have the solving algorithm run if they choose. I created an executable and setup wizard as well so others can download and install the game using a simple plugin installed similar to PyGame called Cx_Freeze. With this, I can change the logo of the executable, create a setup wizard, and so much more. I hope you enjoyed coding this project with me and implemented new functionalities to your liking.