All posts by Alondra

Meet Gold

Written by: G. Okorie Spark TEK Specialist UNT Graduate Data Analytics

Hello Everyone,

My name is Gold Okorie, and I’m a graduate student majoring in Data Analytics with the hopes of becoming a Data Analyst in a multi-national company.

I love working at the Spark because I get to work with different people from diverse backgrounds. The makerspace has given me the opportunity to learn about different technologies and the use of these technologies creatively in a non-traditional setting. I personally love working with the Cricut machine because I love the idea of creating a wide variety of crafts such as designs on a shirt, make a personal greeting card or stickers, and so much more.

Outside of working in the makerspace, I love to bake and binge-watch comedy shows.

The Spark Makerspace is open to the UNT community, and I’m hoping it will be utilized and foster creative thinking within the community.

Meet SARA

Written By: S. Flores Spark Specialist UNT Junior Anthropology

My name is Sara Flores. I’m in my junior year of undergrad here at UNT focusing on anthropology with a minor in French. I am a maker at The Spark, and my specialty is sewing and textiles. I am driven not only to create but to teach as well. Helping people unlock their potential with sewing is my favorite part of the job! I was originally taught to sew by my mother at only five years old, and I have been designing costumes and apparel for nearly a decade. I also have an interest in history that I love to combine with my work to create historically inspired and constructed garments.

All the available technology in the makerspace has allowed me to broaden my horizons since joining the maker team. I’ve been able to utilize our large collection of audio and visual gear to explore my interest in filmmaking. So far, I’m enjoying editing videos!

At home, I enjoy working with leather, drawing, painting, and designing anything from clothing to furniture to landscape. One of my favorite places in the world is a good renaissance festival, and I love wearing my historical creations there! I believe creativity is the most valuable asset one can have, and the tools and teachers at The Spark Makerspace are more than capable of helping you discover your creative side and develop your skills to make products you’re proud of.

Meet Susmitha

Written by: S. Pokala Spark TEK Specialist UNT Graduate Information Technology and Decision Sciences

My name is Susmitha, and I’m a Business Analytics graduate student at UNT studying Information Technology and Decision Sciences. Every step of the way, I was inspired to create a novel information processing architecture, and I made sure to devise a novel technique that decreased manual work because that is the essence of engineering.

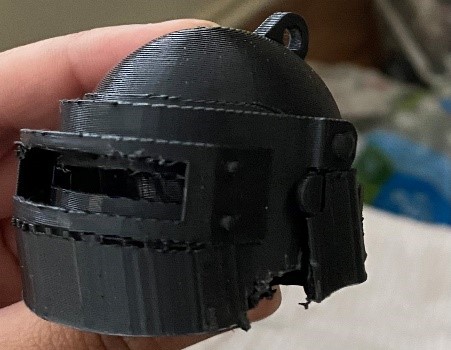
I am an Electronics and Communications graduate, and one of the projects I built for my course work was an ultrasonic sensor-based application (Arduino) that would activate an alert within the device if an obstruction appeared in front of it, signaling the presence of the obstacle. This initiative was created with the goal of preventing blind people from becoming involved in traffic accidents. The Spark Makerspace has provided me with invaluable opportunities to share my skills with my peers. It’s been a fantastic opportunity for me to acquire new skills and techniques in Arduino and Raspberry Pi 4. I’m still attempting to master all of the new tools accessible in Spark Makerspace, such as LittleBits, project planning, 3D modeling, and printing. Spark’s Makers are quite pleasant to work with and patient in guiding you through the process. I recently 3D built a PubG helmet and am eager to learn about all of the additional tools and equipment that are available. My hobbies include traveling and experiencing various cuisines. I used to travel a lot when I worked in IT, but I haven’t had much chance to visit the United States yet.

The Spark Makerspace is an excellent resource for UNT students who wish to pursue their interests and creativity in both their personal and professional lives. This location is brimming with information and specialists from a variety of fields. Our Spark family always extends a warm welcome to you. Come in and take advantage of our resources to achieve your goals.

Electronic Music

Hello everyone!

Just a little heads up, I recently completed an episode of the MindSpark podcast with Alondra and Steven where we talked about introductions to Electronic music. I’ll include a link to it at the end, but I’ll go ahead and summarize things here for those that can’t go listen to it themselves.

The conversation started with each of our tastes in electronic music and the scope of our experience with it. We decided that it best to give you all an idea of where each of us comes from since this genre of music is so diverse.

Now, Alondra and I don’t have much experience composing music; Steven is the only one out of us three that does. So, Alondra and I had to do a lot of research for this episode, and we gained a bit of an idea of what it’s like to start making this kind of music. That combined with the experience Steven has, we came up with a few notes to remember when starting a path down creating electronic music.

First, don’t overcomplicate things. You don’t need to buy hundreds of dollars of equipment. All you need is a computer with a Digital Audio Workstation (or DAW) and a mouse. Learn the ropes first and develop a style before spending money on this.

Second, listen to plenty of music. Artists need inspiration and the easiest way is to understand the things people have developed. Now, we’re not condoning copyright infringement, but understanding how an artist created a piece is crucial to getting used to creating.

And third, don’t be afraid to get in and start playing around with stuff. Try out everything. One of the most common things we tell people who come to the makerspace is doing is one of the best ways of learning.

I know this doesn’t represent an in-depth guide on how to get started, but there are already so many tutorials on every detail you need. Instead, I wanted to give you an overview of the tips that Alondra, Steven, and I decided on after our research for the topic. Tips that should give you a bit of momentum when you first take steps into this topic.

Meet Specialist Aiden

Written By: A. Pacheco Spark Specialist UNT Junior Media Arts 

My name is Aiden Pacheco. I am a Media Arts major, and I will most likely go beyond this major in the future, hopefully in the cinema or VFX area. A majority of my projects now and in the future are centered around the visual department. I love working with cameras and software such as Adobe Suite, Blender, or Cinema 4D. I am also extremely passionate about videography and photography. I am hoping I can have more projects that involve video or photo editing soon. Luckily, I found the makerspace here at UNT. Now, I can brainstorm projects with other makers and make cool stuff. I still have so much to learn, but I am beyond excited to learn from my peers. It is amazing having access to equipment I had never heard of before and being around people who are passionate about creating using said equipment. I feel like now I can properly branch out and grow creatively.

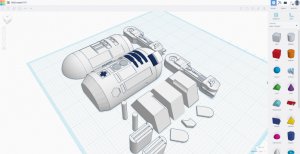
Here recently, I have been most interested in Blender in creating models, texturing, and making virtual scenes. It first began with creating models through TinkerCAD. I created an R2D2 model entirely from scratch, no premade shapes or help.


Learning how to combine and manipulate shapes may sound simple, but it led me to more complex modeling. When I first began using Blender, I was immediately overwhelmed. I was lucky to have been introduced to TinkerCAD and Cinema 4D first and have implemented similar methods of modeling into my Blender projects. I have found that the modeling community is massive, so finding .obj models is not difficult.


I’ve been teaching myself how to texture these models accurately. It was more difficult than I anticipated, so I have been trying to expand my knowledge so I can further this project to the best of my ability. I am glad I have the help of my coworkers. This will hopefully become a virtual tour of our location at Discovery Park, with the help of my peer, Hanna.

The Makerspace here at UNT has become a new home for me. I have never worked at a place where I have felt more comfortable to be myself and to share my ideas. I know I can always depend on my friends here to push me creatively.

Easy Project Ideas

Lastly, what are some easy projects I can do to get started?

https://www.allfreesewing.com/Miscellaneous-Projects/Serger-Basics-Serger-Sewing-Projects-NSM2018

This link here is to the website I found these project on but I will also list them here;

Insanely Easy Silk Infinity Scarf

https://www.allfreesewing.com/Accessories-to-Sew/Insanely-Easy-Silk-Infinity-Scarf

“This Insanely Easy Silk Infinity Scarf tutorial is a two-for-one. Firstly, and most importantly, you get a gorgeous infinity scarf sewing pattern, and secondly, you’ll learn how to sew a hem with the overlock technique if you have a serger. If not, the tutorial also includes instructions for regular sewing machines. This silk scarf is amazingly easy to make and will keep you looking fabulous even in the coldest winter months. Whether you use a frayed edge or a rolled hem, this scarf will brighten up any winter outfit!”

Project Type: Learn a Technique

Time to Complete: In an evening

Sewn by: Machine

Downton DIY Headband

https://www.allfreesewing.com/Sewn-Hair-Accessories/Downton-DIY-Headband

“For you or other fans of the hit program, add this Downton DIY Headband to your list of easy-to-make gifts. Free vintage sewing patterns like this one look like an heirloom but can be made from a ribbon and serger. This DIY headband is reminiscent of styles that have sailed through centuries. Whether you’re dressed up or down, this sewn accessory will top your ensemble off with a romantic touch, and it only takes under an hour to make.”

Project Type: Make a Project

Time to Complete: Under an hour

Sewn by: Machine

No Pattern T-shirt and Dress

https://www.allfreesewing.com/Dress-Patterns/No-Pattern-T-shirt-and-Dress

“This project is ideally suited to those who are just getting started with their serger. It is quick to sew and easy to wear and combines both the use of the serger and the sewing machine. Made using forgiving jersey, you can choose the length to make either a dress or a t-shirt, both ideal summer makes. You could use heavier weight jersey or even stretch denim to make autumn/winter versions too. The tutorial is written by sewing author, teacher and pattern designer Wendy Ward.”

Project Type: Make a Project

Time to Complete: In an evening

Sewn by: Machine

That is all! Thank you for reading this long blog post!

-Tryston

Written By: T. Bruner

Hackathons, more than security

Check out one of our latest podcast episodes to learn about Hackathons!

Hackathons are a great way to learn any kind of programming, not just hacking! In this episode, we talk about what hackathons are, what kind of projects and people you can work with, and why you should consider signing up for your next university-sponsored hackathon. We also share our experiences with hackathons and with programming!

Arthur:

Hi, I’m Arthur Sliter and I am a Spark Specialist majoring in mechanical engineering. My experience lies with 3D Printing, design, automation, and robotics but I have never participated in a hackathon so I can provide a beginner’s viewpoint for this podcast. Since my skills are more on the mechanical than software side I will be digging into the role non-programmers can play in hackathons and how this affects team dynamics.

Hanna:

Hi! My name is Hanna, and I’m graduating this semester with a Computer Science degree. I love working in a makerspace because it allows me to learn skills I would never have been able to learn otherwise. In addition, the flexibility of a makerspace has allowed me to turn my position into a software development role that still benefits the makerspace as a whole. I grew up in a creative home with parents who encouraged my exploration from the very beginning. The garage is a woodshop, and the living room is a seamstress’ paradise. My home has always been a makerspace of my own, and working in a makerspace has been the most natural and enjoyable position I can imagine. To live and work in a place that always encourages trying something new just to see if it will work has made me happier than I could have ever hoped for, and I aim to be active in the community of makerspaces for the rest of my life!

Tad:

My name is Tad. I am a maker at UNT Spark Makerspace. I am a senior Computer Science student specializing in Cyber Security from NSA. I am a DIY enthusiast, so I build most of my machines and projects myself. I think with the right tools and skills anyone can build. As a computer science student, I have participated in a few hackathons. I think hackathons are great for experience and to gain confidence in the field. Participants can also make great friends. In this podcast, I will elaborate further on hackathons with a few of my co-workers.

Host Team: Hanna Flores, Tad Weerasignhe, and Arthur Sliter

Audio Production: Steven Sparkman

Producer: Judy Hunter

Taz and Remix 3D Printers

The Lulzbot TAZ 3D printers are one of the most user-friendly printers on the market. The first two printers in the LulzBot 3D Printer cluster were Prusa RepRaps put together with printed parts purchased off the Internet. They were built in the first quarter of 2011. These two printers printed the next set of parts needed by the subsequent LulzBot Prusa Clonedels.

LulzBot was founded in 2011 by the parent company Aleph Objects. Their fully open-source workhorses are renowned for their robust design and reliability, though their high prices have largely kept them off the individual hacker’s bench. While the printers did not do well in the consumer market, it did exceptional in the industrial market. The reliability of their machines got them to be used by the United States Marines. The open-source system led it to be used by The National Aeronautics and Space Administration. NASA uses a modded Lulzbot TAZ 4 to 3D print tools on the International Space Station.

Though the Lulzbot TAZ printers had short success in the industrial and commercial field, consumers did not want to spend a grand on a desktop printer when there were better, cheaper options. Due to this, in 2018, the company announced that there were many layoffs in the company. This came in correlation with bad financials following the first quarter of that year. An email attributed to Aleph Objects states, “We regret to inform you that the owners of Aleph Objects Inc, makers of Lulzbot 3D printers, have decided to close down the business as of Wednesday, October 9th, 2019. Operations will continue through October 31st, 2019 to sell through existing inventory.” Of the company’s 113 employees, only 22 would remain onboard to maintain day-to-day operations.

Following the speculation that Aleph Objects, manufacturer of Lulzbot open-source 3D printers had met its end, the company has refused to deny claims that it is indeed shutting down. Some insiders said they had heard expected a buyout, and soon the sale of Aleph Objects to Fargo Additive Manufacturing Equipment 3D (FAME 3D) became official.

This new financial backing certainly is good news, but it would be naive to think this is the end of LulzBot’s troubles. The community has made it clear that cheaper and more accessible desktop printers are more attractive. The company has said they are willing to create a new, more affordable option to their printers. Though Lulzbot’s company has had issues internally, the projects such as its entry into the 3D bioprinting market in early 2018 may keep the printer’s name afloat.

Written by: P. Friedman

Landscape Photos

A Guide to Landscape Photos:

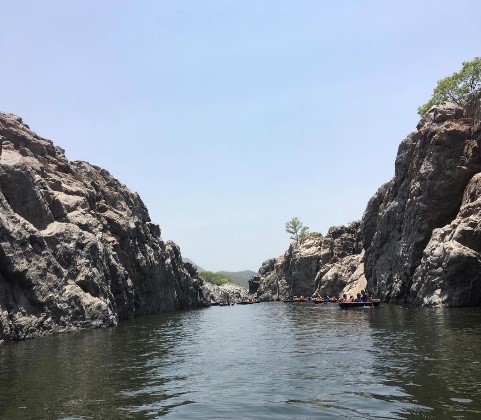
Landscape photography is a peaceful and relaxing way to spend time with nature and the great outdoors. This can be a great reason way to get out of the house during social isolation.

To take great landscape photos, first try scouting out an area you believe would make for a good composition. This can be done in person, or alternatively online through Google Street View. For gear, make sure to pack a wide angle lens and tripod, as well as anything you would bring on a hike. Make sure to plan out your shoot before heading out, as this can help save time later and usually leads to a better end product.

Landscape photos are most often done with a high depth-of-field to keep everything in focus, both near and far. This is achieved by using a high aperture setting. Most lenses can either go up to f/22 or f/16; combine these high apertures with the tripod to ensure a steady shot, as the camera will most likely need to be set for a longer exposure time. Once you are ready to shoot, make a couple test images and review them on-camera to troubleshoot unexpected issues. If you find that your images are blurry despite using a tripod, try turning on the self-timer to alleviate camera shake from pressing the shutter button. 

As always, make sure to be safe if going out alone. Bring plenty of water and pack a snack and first aid. Happy shooting!

Written By: The Spark Team

General Advice && FAQ – Serger

General advice

  • Use a bit of thread wax to stiffen the ends of the thread to make it easier to thread the needles and loopers.
  • THIS ONE IS IMPORTANT: It is possible to rethread your loopers by ‘tying on’ a new thread. Snip the upper looper and lower looper threads between the thread tree and tension disks. Replace the spools, tie the new thread to the old with a small overhand knot, and pull through the loopers.
  • Also, just a reminder! If you are running short on thread cones, you use thread spools in your needles. You can even wind your own threads spools from your serger cones!
  • Buy good quality thread
  • Serger can’t backstitch (Well, in fact, it can… but you will not desire to do so, because it will cut your newly made stitches!)
  • IMPORTANT! Never Sew on Pins! Your needle will break! and either hit you in the face or fly off somewhere. Also, you will have to buy another double needle!
  • A Serger goes faster than a sewing machine (a.k.a: don’t push down your foot!)

FAQ

Do I have to have a serger?

Well, it depends on what kind of sewing you do and how often you do it. You technically don’t even really need a standard sewing machine. Lots of people like to sew by hand. I don’t. I very much dislike hand sewing.

If crafting and sewing is just a hobby, and you don’t know if you’ll stick with it forever, a serger can probably wait, especially if you don’t have $200 to burn. You can always keep an eye out for used sergers on eBay or refurbished from amazon.

If you sew a lot for yourself or your kids, or anything else like in my case I am a fashion major in college, and on the side, I like to make costumes. Also! and you work with a lot of knits and stretch fabrics, a serger will make your life a million times faster and easier.

If you’d like to produce clothes or other sewn items for sale, a serger will make your stuff look more professional. Everything produced in stores uses a standard 4 cone serger.

So the short answer, in my opinion, is No.

What is overlocking? Are a serger and Overlocker the same thing? Is there a difference?

A serger and an overlocker are essentially the same things. These names are used interchangeably.

Overlocking is stitching the edges of fabrics ( one or more layers ) for hemming, edging, or seaming.

A Four / five thread serger forms a seam with a chain as well as overlocks the edges, so this serger is way more than a simple overlock machine.

Why do I need a Serger? What are the benefits I get in owning a Serger?

Serger finishes the seam and edges in one go – so saves a lot of your time

Serger stitch is best for sewing knits, being very flexible and stretchy

Narrow seams, overcast edges, rolled hems, blind stitched hems are all easy with sergers

How is a serger different from a sewing machine? When to use a serger vs sewing machine?

A serger cannot be a substitute for a sewing machine. You cannot topstitch, sew buttonholes, attach zippers or stitch corners with a serger.

But for its particular use, it is the best. it can make your sewing look top-notch. It sews, trims, and overlocks the edges fastly and conveniently in one go. You can use it as a very useful accessory which will make your sewing a lot easier and faster.

What are the different types of sergers available?

The sergers are categorized according to the number of threads they use to form stitches.

  • 2- thread overedge serger – This is an overlocking machine alone; it does not sew a seam.
  • 3 Thread Overlock serger – I would recommend this as a useful serger as it works seams and overlocks as well.
  • 3 / 4 Thread overlock serger – Here 3 thread stitch is made with an extra stitch down the middle. This is a very suitable one for sewing thin knits as well as woven cloth
  • 4 Thread overlock – This serger makes a seam with two thread chain stitch and then uses two threads to overlock the edges
  • 5 Thread overlock serger – This serger makes a seam with two thread chain stitch and then uses three threads to overlock the edges

What are the things to look for when buying a serger – Must-have features in your serger

  • How many threads are used in the serger? One, two, three, four, or five
  • Does the serger have a free arm?
  • A free arm is needed to easily sew all points of garments.
  • Is it easy to thread?
  • A sewing machine is a breeze to thread. But not so the serger. At first, you may find the instructions difficult to follow and difficult to remember. Ensure that the instruction manual of the serger has clear instructions to thread the machine easily and efficiently. Check that the serger comes with color-coded guides to thread properly.
  • Can you change the stitch width and length easily enough?.
  • Does it have other features like other types of stitches and is it easy to change between them?
  • The serger usually has an overlock & chain stitch. Check if your serger has other stitches you may need like a cover stitch or rolled hems, blind hem. Check whether you need them even if the machine has them. You should not be buying extra features that you may not even use after the first few times.
  • Does the serger feel stable when the machine is sewing or does it feel fragile?
  • Can the tension be adjusted easily enough?
  • Accessories along with the serger – Do they cost extra and how does it add to the cost?
  • Your serger will usually come with the following accessories – dust cover, travel case, accessory case, carrying handle. Verify that the serger accessories and the manual list match
  • Can the serger handle heavy fabrics or many layers of fabric?

Written By: T. Bruner

-Stay tune to the last post of the Serger Series: Easy Project Ideas-